


Get ready to indulge in Sabudana Vada, a traditional Maharashtrian delicacy where the star ingredient, sabudana (tapioca pearls), shines! These fritters have a unique, chewy texture on the inside with a crisp, golden exterior that perfectly contrasts. Paired with a sweet and spicy yogurt chutney, the crispy sabudana creates an irresistible crunch that takes your taste buds on an unforgettable journey!

Want to Save This Recipe?
Enter your email & I'll send it to your inbox. Plus, get great new recipes from me every week!
By submitting this form, you consent to receive emails from Minstry of Curry
Jump to:
Sabudana Vada is a popular fasting food in India, traditionally made during festivals like Hartalika, Maha Shivratri, and Ganesh Chaturthi. These flavorful fritters are not only delicious but also hold a special significance in festive celebrations and fasting rituals.
I hold fond memories of my mom celebrating Hartalika, setting up the Puja, and crafting the shiva-linga from clean river sand. She would offer fresh 'Bel Patra' leaves to Lord Shiva and lovingly recite the story of Hartalika, ensuring we understood the significance of the day. A special meal followed, featuring delicious fasting dishes like sabudana vada, sabudana khichdi, and sabudana thalipeeth.
Even now, whenever I visit India, my mom never fails to make Sabudana Vada for me, and I can never resist them! They're incredibly tempting, and once you start, it's hard to stop. Whether you're fasting or not, Sabudana Vada is the perfect snack -delicious for lunch, dinner, or any time in between!

I often make Sabudana Vada using a paniyaram/aebleskiver pan to skip the deep frying. The results are incredible-still crispy on the outside, soft on the inside, but without all the extra oil and the hassle of deep frying. Lately, I've also experimented with air-frying Sabudana Vada, and I have to say, the taste and texture are spot on! Both methods offer a healthier twist without sacrificing that delicious crunch we all love.

Ingredients
- Sabudana (Tapioca pearls) - the star of the dish, sabudana should be soaked until soft, these give the vadas their signature texture.
- Potatoes - Boiled and mashed potatoes act as a binder and make the vadas soft and melt-in-your-mouth delicious.
- Peanuts - roasted and coarsely ground, add a delightful crunch and nutty flavor to the vadas, making them irresistible.
- Green chilies - finely chopped green chilies add subtle heat and flavor kick. I also love adding a pinch of Kashmiri red chili powder for a vibrant color and mild spice.
- Ground Cumin - adds an earthy aromatic flavor to the vada.
- Sugar - a little bit of sugar helps balance the flavors, especially the spiciness of the chilies.
- Lemon juice - adds a zesty, tangy element to brighten up the flavor.

How To Make Sabudana Vada
Step 1: Prepare the ingredients
- Rinse sabudana and drain all the water. Add 1 cup of water and allow the sabudana to soak for 4 hours or overnight.
- Roast peanuts and grind them coarsely. If you are using peanuts with skin, remove the skin by gently pressing peanuts on the palm of your hands, after they have cooled down. Then blow over the skin to discard it
- Steam, peel, and mash the potato. Note: I like to use Instant Pot to steam the potatoes - Add 1 cup of water to the stainless steel insert, place the trivet, and place the medium-sized potatoes on the trivet. Pressure cook for 12 to 15 minutes depending on the size and allow natural pressure release.
- Coarsely grind cumin seeds and green chilies. Note: You can also red chili powder instead of green chilies or a mix of both
Step 2: Dough
Combine the soaked sabudana, mashed potatoes, ground peanuts, green chili, red chili powder, ground cumin, lemon juice, salt, and sugar. Mix everything thoroughly by hand. Shape the mixture into lemon-sized balls. If you're using an air fryer, Crisp Lid, or deep frying, gently press the balls to form patties.


Step 3: Cook using one of the 3-ways
Method 1: Traditional deep-fried
- Heat oil for frying in a medium frying pan. Once the oil has heated well, add 2 to 3 flattened Sabudana Vadas to the oil and fry them on low-medium heat until the outside of the vadas are light golden brown and crisp
- Note: flattened sabudana vadas work best for deep frying giving the perfect crispy texture. Be careful and keep a safe distance from the pan as sometimes the individual sabudana pearls may burst in the oil splattering oil out of the frying pan


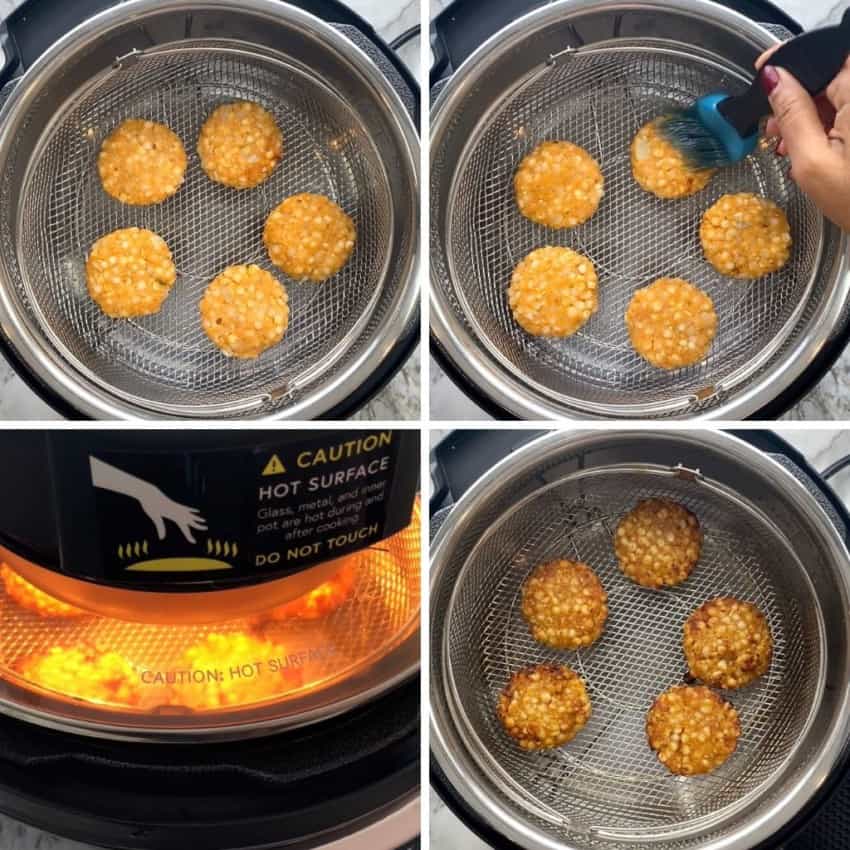
Method 2: Using Airfryer
- Preheat the air fryer to 400 F.
- Spray the air fryer basket with oil and place 4 to 6 vadas at a time in the basket with some space between each. Lightly brush the vada with some oil.
- Airfry at 390 F for 16 to 18 minutes turning over halfway through. Brush more oil on the vadas after turning them over.


- You can also use the air fryer lids placed on top of the Instant Pot Pressure cooker.
Method 3: Using the Paniyaram Pan
- Heat the paniyaram/aebleskiver pan on medium low heat. Add a few drops of ghee or oil in each round section. Place the sabudana vada balls in each section and cook covered for 4-5 mins. Depending on the thickness of the pan, it could take more or less time
- Gently flip the fritters using a chopstick or a small spoon to cook the top side. Add a few more drops of ghee on top of each fritter. The ones in the center definitely cook much faster, so they will have to be flipped first. Cover and cook again for another 4-5 mins on medium-low heat until they are golden brown and crisp.


Step 4: Chutney
Whisking together yogurt, ground peanuts, red chili powder, sugar, and salt in a medium bowl.
Serve hot sabudana vadas with peanut chutney. Make the delicious sweet potato halwa and enjoy a complete fasting meal.

Did you enjoy this fun Indian snack? Here are some more of my favorite Indian vegetarian light meal recipes:
★ Have you tried this recipe? We love your feedback, Please click on the stars in the recipe card below to rate.
Recipe

Sabudana Vada Three Ways: Crispy, Air-Fried, and Guilt-Free Appe Pan Magic!
Equipment
Recipe Video
Ingredients
- 1 cup sabudana (best bought from Indian stores)
- 2 medium yellow potatoes (2 cups mashed potatoes)
- ½ cup roasted and ground peanuts
- 1 teaspoon ground cumin
- 1 teaspoon crushed green chilies
- ¼ teaspoon Kashmiri red chili powder optional
- 2 teaspoons lemon juice
- 2 teaspoons kosher salt
- 1 teaspoon sugar
- 3 tablespoons oil (or more oil for deep frying)
- 1 tablespoon chopped cilantro optional
Chutney Ingredients
- 1 cup plain yogurt
- ¼ cup roasted and ground peanuts
- 1 to 2 teaspoons kashmiri red chili powder
- 2 teaspoons sugar
- 1 teaspoons kosher salt
- ¼ cup water
Instructions
- Rinse sabudana and drain all the water. Add 1 cup of water and allow the sabudana to soak for 4 to 6 hours or overnight.
- Steam, peel, and mash the potatoes.Note: I prefer using the Instant Pot to steam the potatoes. To do this, add 1 cup of water to the stainless steel insert, place the trivet inside, and set the medium-sized potatoes on top of the trivet. Pressure cook for 12 to 15 minutes, depending on the size of the potatoes, and allow the pressure to release naturally. Be sure to let the potatoes cool completely before mashing them for the best texture.
- In a medium bowl, combine the soaked sabudana, mashed potatoes, peanuts, cumin, green chili, red chili powder, lemon juice, 1 tablespoon of oil, salt, and sugar. Gently knead the mixture with your hands until everything is well blended. Take about 2 tablespoons of the mixture at a time and shape it into a ball. Makes about 22 vada.
- The ball-shaped vadas are perfect for Appe Pan. If you are deep frying or air frying, gently press each ball between your palms to form 2-inch flat discs, smoothing the edges by lightly pressing as you shape them for an even finish
Traditional Frying Method
- Heat oil for frying in a medium frying pan. Once the oil has heated well, add 2 to 3 flattened Sabudana Vadas to the oil and fry them on low-medium heat until the outside of the vadas are light golden brown and crisp
- Note: flattened sabudana vadas work best for deep frying giving the best crispy texture. Be careful and keep a safe distance from the pan as sometimes the individual sabudana pearls may burst in the oil splattering oil out of the fry pan
Using Airfryer
- Preheat the air fryer to 390 F. Lightly spray the air fryer basket with oil.
- Place 4 to 6 vadas at a time in the basket with some space between each. Airfry the Vada for 8 minutes at 390 F.
- Carefully flip the vadas in the air fryer basket using tongs. Brush the tops with a little more oil, then continue air frying for an additional 8 to 10 minutes.
Using paniyaram/aebleskiver pan
- Heat the paniyaram/aebleskiver pan on medium low heat. Add a few drops of oil in each round section. Place the round vada balls in each section and cook covered for 4-5 minutes.
- Gently flip the vadas using a chopstick or small spoon to cook the other side. Drizzle a few more drops of oil on top of each vada. The vadas in the center tend to cook faster, so flip them first. Cover and cook for another 4-5 minutes on medium-low heat until they turn golden brown and crispy.
Make the Chutney
- In a medium bowl, whisk together yogurt, ground peanuts, red chili powder, sugar and salt to make the chutney
- Serve the sabudana vada hot with this sweet and spicy chutney
Nutrition
♥ Subscribe to our Youtube Channel for tasty and easy video recipes. Looking for more Instant Pot recipes? Check out our delicious Instant Pot Recipe board on Pinterest.
lindseylivings says
First time I've seen your blog and I'm impressed. Sounds delicious and the pictures are great 🙂
Archana says
Thank you Lindsey!
Rateka says
Wao... lovely texture ??
Archana says
Thank you Rateka! They are crispy in the outside and moist and Yumm inside.
Utkarshini Khanna says
We made this and it was yummy yum yum???
Archana says
Great! So happy you like it. Thank you so much for letting me know.
circusgardener says
These look delightful, and the background story about Hartalika and your mother is lovely.
Archana says
Thank you Steve! These are indeed very delicious and yes my mom still celebrates with same energy and enthusiasm!
Freda @ Aromatic essence says
They look even better than the deep fried ones! Love it 🙂
Archana says
Thank you Freda! This is the only way I make sabudana vada now.
sheenammuskaan says
Sabutdana tikkis or vadas are my favourite. This healthier version looks amazing.
Archana says
They are my FAV too! And making them this way only allows me to eat a couple more 🙂
dudeandthefood says
Hi Archana, I have mentioned you in this post. Keep putting the inspirational content that you do ?
https://blogdudeandthefood.wordpress.com/2017/09/09/three-of-my-favorite-food-blogs/
Archana says
Thank you !
Chetna Patel says
This looks SO yummy and I so want to try it but sadly, I do not have the deep round pan and lid to make it! 🙁
Archana says
Check out paniyaram pan on amazon.com So many things you can cook in it. Good way to enjoy lot of foods without having to deep fry them
Srini says
Hi Archana,
Tried your awesome recipe. The vada turned out be a family-pleaser..... Thank You
Archana says
You are welcome!!
Amrita says
I tried this recipe today and loved it! Thanks for sharing.
Archana says
Awesome! Thank you for letting me know.
Toral says
Hi. I don't have pan. What is my alternative for the same ?
Nikita Palkar says
Thanks for a healthy recipe of my fav Sabudana Wadas! Tried it and was an instant hit!! This ones definitely on my repeat list
Archana says
Thank you! I love these sabudana wadas too!
Mouli says
Hello Archana, I am new to your blog - congratulations you have done such a great job ....
I just wanted to ask if you know of a good appam pan for an induction hob ?
Thanks
Mouli
Archana says
Hi Mouli, so sorry but I do not have a appam pan that I have tested on Induction stovetop. Have you checked on amazon?
sne3103 says
How much sugar do you need to add to the vadas? The ingredient list doesn’t specify..
Archana says
1 teaspoon. I will add it to the ingredient list
sne3103 says
I ended up not using the sugar, they came out wonderful in the air fryer. Thank you for yet another wonderful recipe!
Priyanka Kumbhar says
Made Sabudana Vada today, airfried them. Came out so yum.
This was my very first attempt at making sabudana vada, I am very happy with the results.
Thanks for recipe.
Aishwarya says
Easy to follow recipe!
Smruti says
I made this both in the aebelskiver pan and the frying pan and they turned out delish! I did find them a bit bland so added a teaspoon of chaat masala which made it taste even better. I served it with ketchup for the kids and for adults green chutney. Will definitely make it again. Would it be ok to make the mixture a day in advance and store it in the fridge until I'm ready to make them?
Archana says
Hi Smruti! Yes, you can make the mixture a day before and keep it in the fridge.
Harpreet says
Hi! I'm very curious, Can we prep the vadas and save in the freezer to airfry a few days later? Thank you very much. Looking forward to trying this recipe very much!
Archana says
Yes, absolutely. I would make sure to thaw them overnight in the refrigerator.
Lohaz says
My airfryer’s maximum temperature is only 400 F. Can you help me with timing adjustments please? I’d love to try this recipe.
Archana says
This recipe was tested using an airfryer lid. For a basket or toaster oven style air fryer you can air fry at 380 F for 15 mins.
Pooja says
First time to your blog and tried this recipe! Turned out to be super delicious Thank you!
Archana Mundhe says
Welcome to the blog! I’m so glad you tried the recipe and loved it—it means so much to me! Can’t wait for you to explore more delicious recipes. Happy cooking!
Neelam Gowda says
Perfect measurements!
Archana Mundhe says
Thank you!