

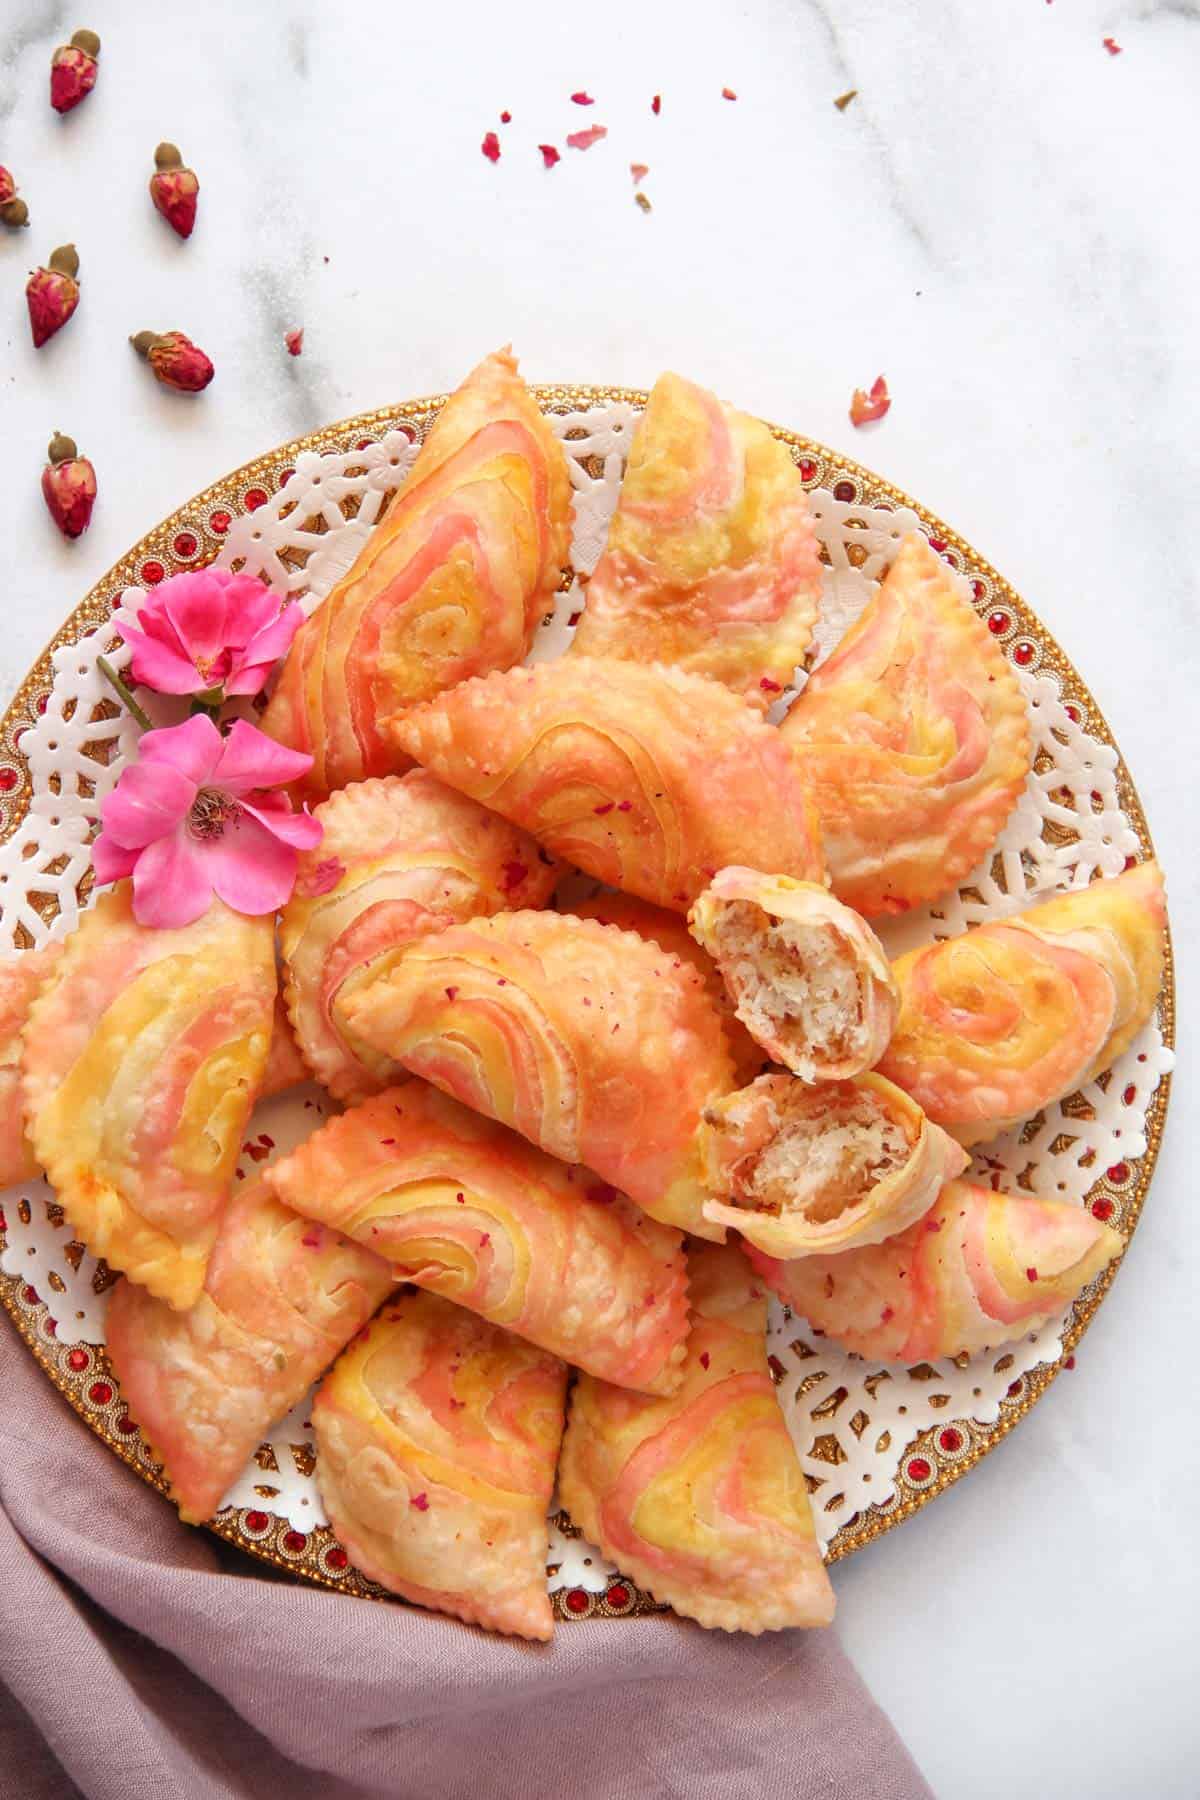
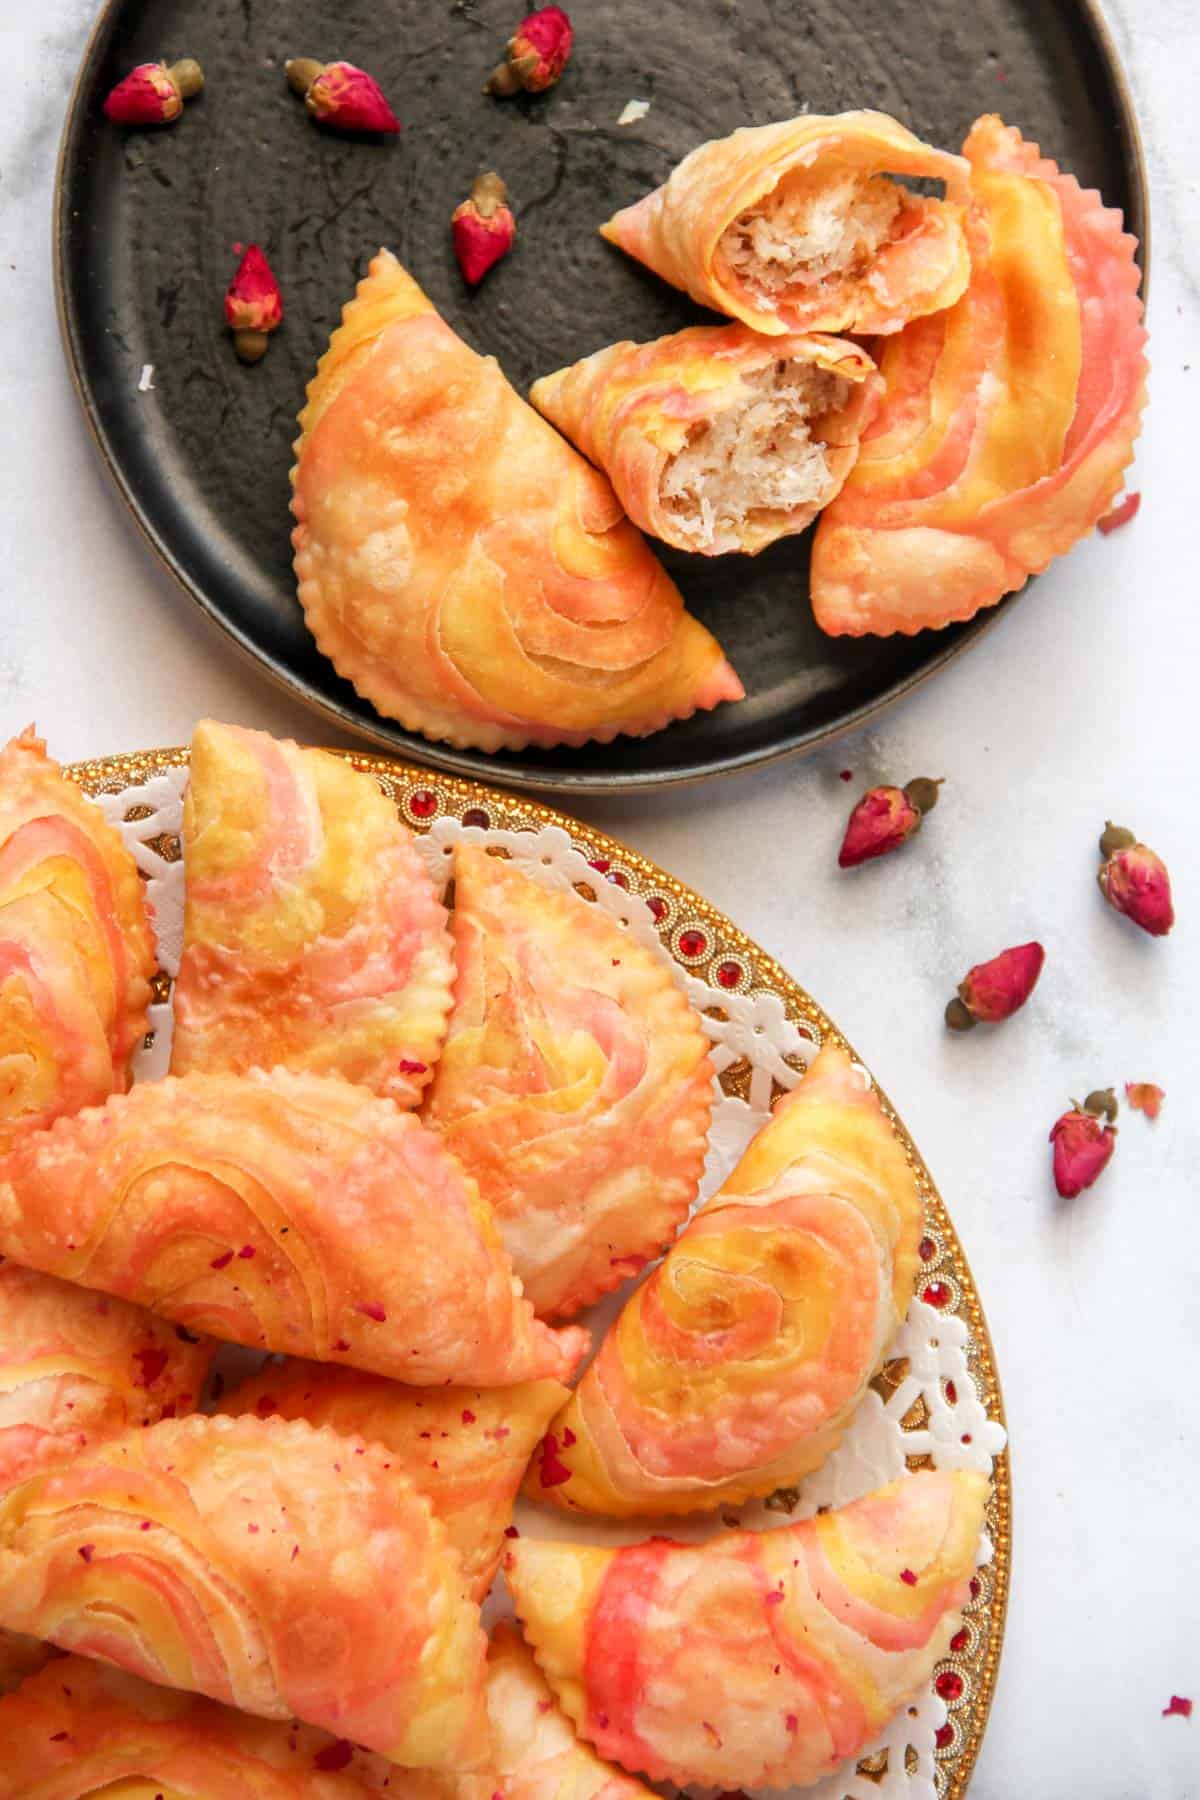
Mom's phenomenal Rose Coconut Karanji is one of my favorite homemade desserts. Swirls of tri-color dough are rolled out and stuffed with the most aromatic filling of coconut and sweet rose. This no-cook filling is mom's modern twist on traditional karanji. Once fried, the outer layers puff and crisp to golden perfection, while the inside remains tender. The divine marriage of flavors and textures in this pastry can only be improved with a cup of chai and a moment to savor the experience.
Want to Save This Recipe?
Enter your email & I'll send it to your inbox. Plus, get great new recipes from me every week!
By submitting this form, you consent to receive emails from Minstry of Curry
This karanji is my mom's recipe; the one I've watched her make every Diwali since I was little. The dough turns perfectly crisp and flaky, and the coconut-rose filling stays fragrant and just sweet enough. Every bite takes me straight back to her kitchen. It's the version I now make with my boys, keeping our family tradition alive one batch at a time.
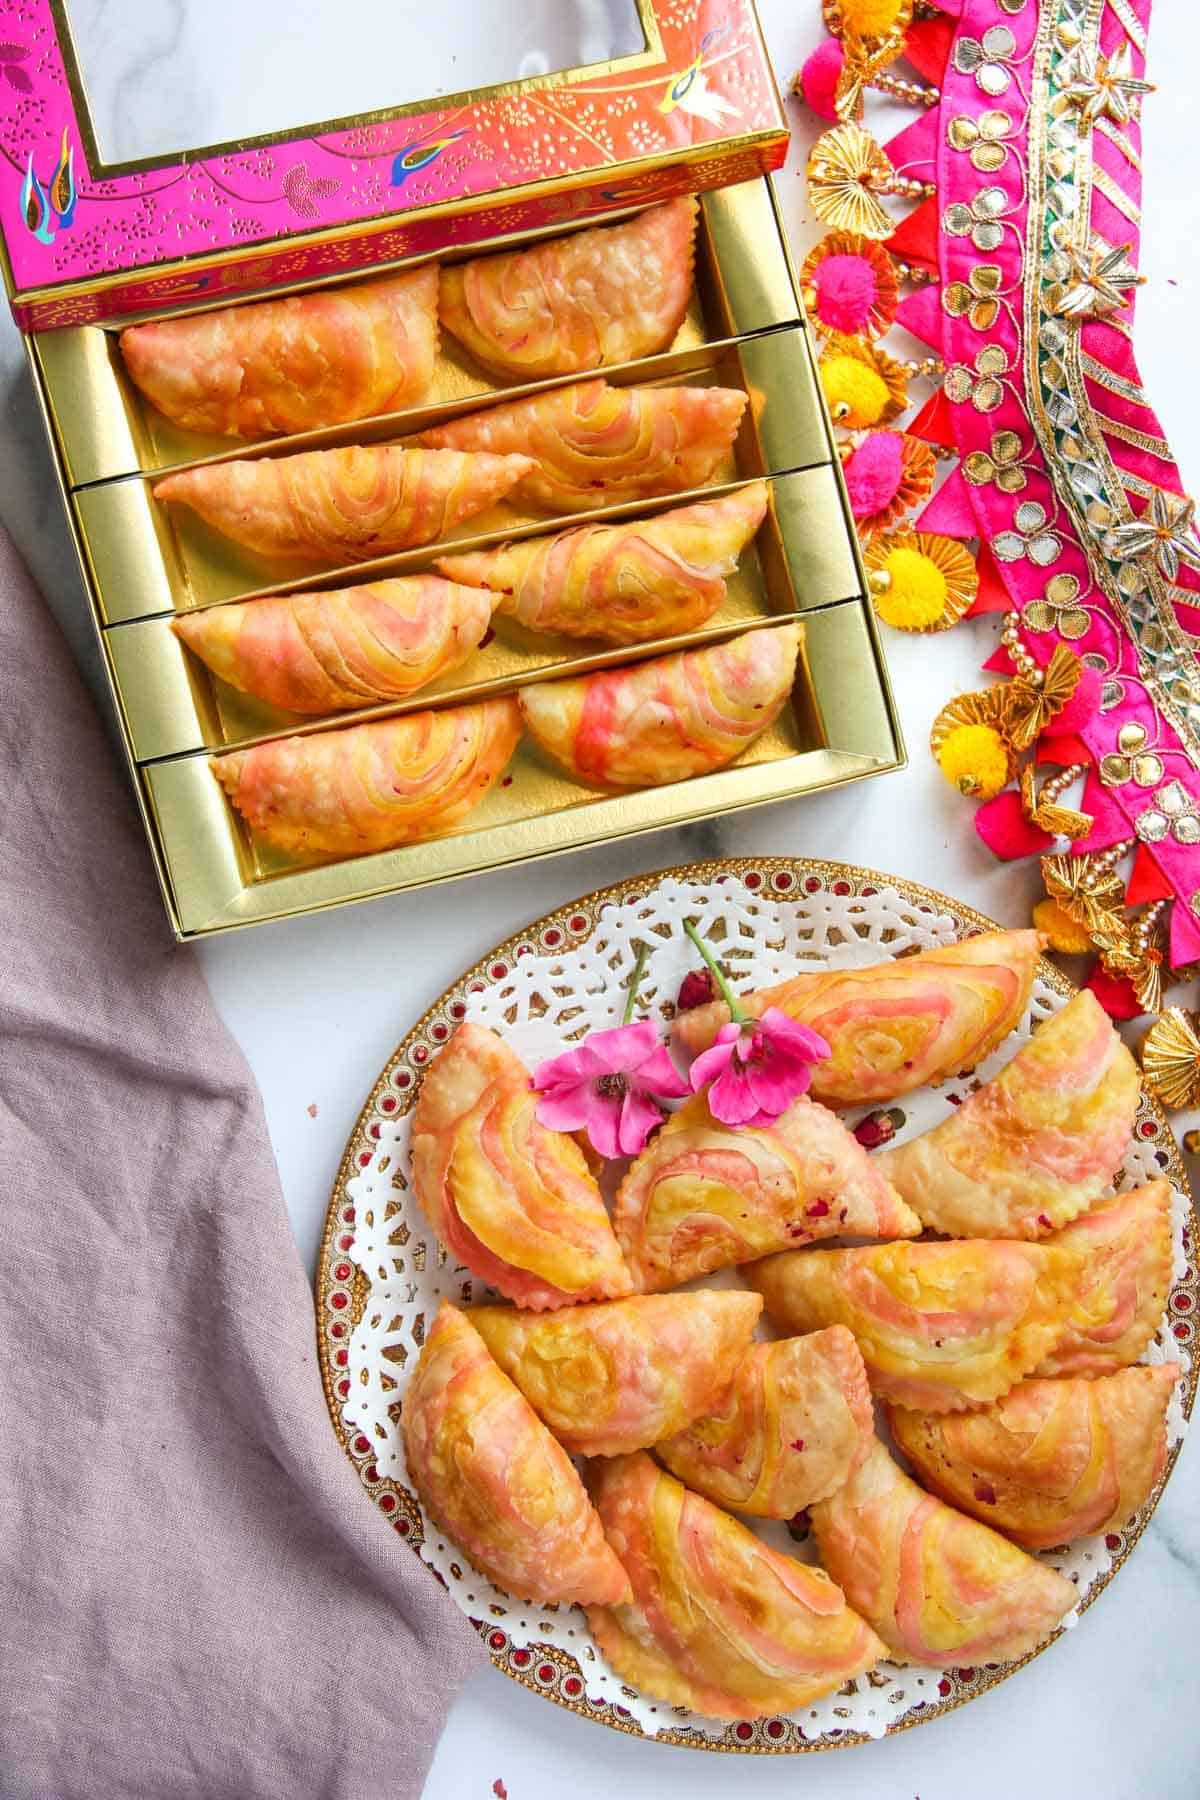
In our home, karanji is part of the traditional Maharashtrian faral spread that's made with love and shared with everyone who stops by during Diwali. Alongside these karanjis, we also make chakli, shankarpali, saranachi puri, and chirote; each one with its own special story, aroma, and place on the festive platter
Karanji Outer Shell
The dough for Karanji is made using a mix of all-purpose flour, semolina, ghee, and milk. Small dough balls are rolled into thin circles to which the sweet filling of choice is added. The circle is folded in half to make a beautiful half-moon-shaped pastry with crimped edges to seal in the filling. The outer shell can also be made by layering dough. A creamy paste of ghee and rice flour (Also known as "Sata" in Marathi) is added between each sheet of dough to create the signature flaky layers.
Traditional Karanji Filling
Traditionally, the Maharashtrian Karanji filling is made with roasted dry coconut, poppy seeds, sugar, cardamom, and nuts. For festivals like Ganesh Chaturthi and Raksha Bandhan, the filling is also made with fresh coconut, which has a unique taste and texture. The fresh coconut Karanji, known as "Olya Naralachi Karanji", has a much shorter shelf life due to the moisture in the fresh coconut.
Mom's No-Cook Karanji Filling
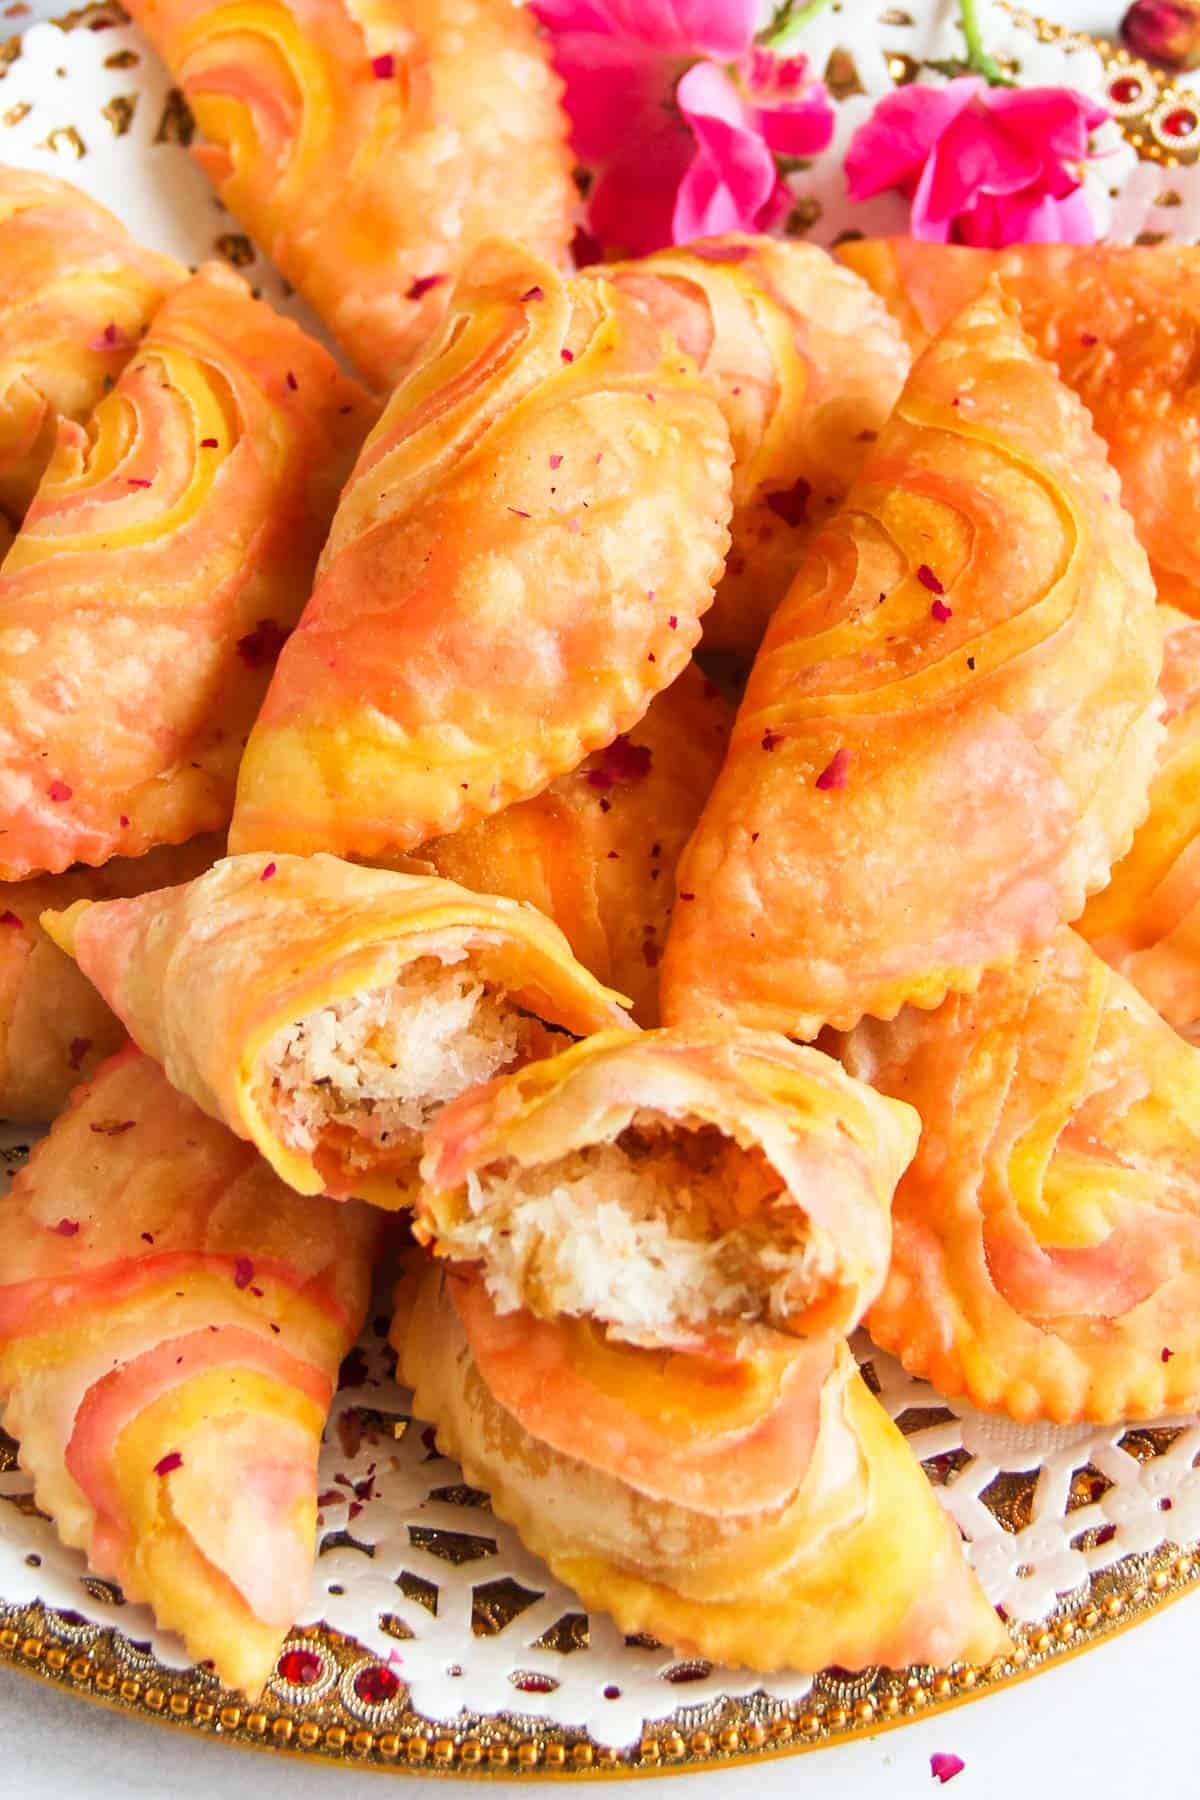
I grew up enjoying my mom's one-of-a-kind Karanji with a rose-coconut filling, which to this day I prefer to any other. Her easy no-cook filling is a time-saver, ready in just 5 minutes without compromising on flavor.
Although the filling is effortless, Mom always takes the time to color the dough using natural ingredients and layers the 3 doughs before rolling. This is time well spent ensuring a light, flaky texture and an eye-catching swirled pattern on top. This recipe has been featured on Twinkl, as part of their Easy Diwali Sweets recipe blog.
*If you are short on time, you can skip the layering process and simply roll the white dough balls.
Ingredient Notes
- Outer Shell - is made with a dough made of all-purpose flour(maida), fine semolina(sooji), ghee, and milk
- Filling - unsweetened desiccated coconut, powdered sugar, rose petal preserves, and rose essence. Simply mix, adjusting the sugar depending on how sweet your gulkand is. If you do not have gulkand, you can add an extra half a teaspoon of rose essence or rose syrup to the filling.
- Layering - to get that signature flaky texture, a paste of ghee and fine rice flour is spread between layers of rolled dough. This step makes all the difference!

How To Make Karanji
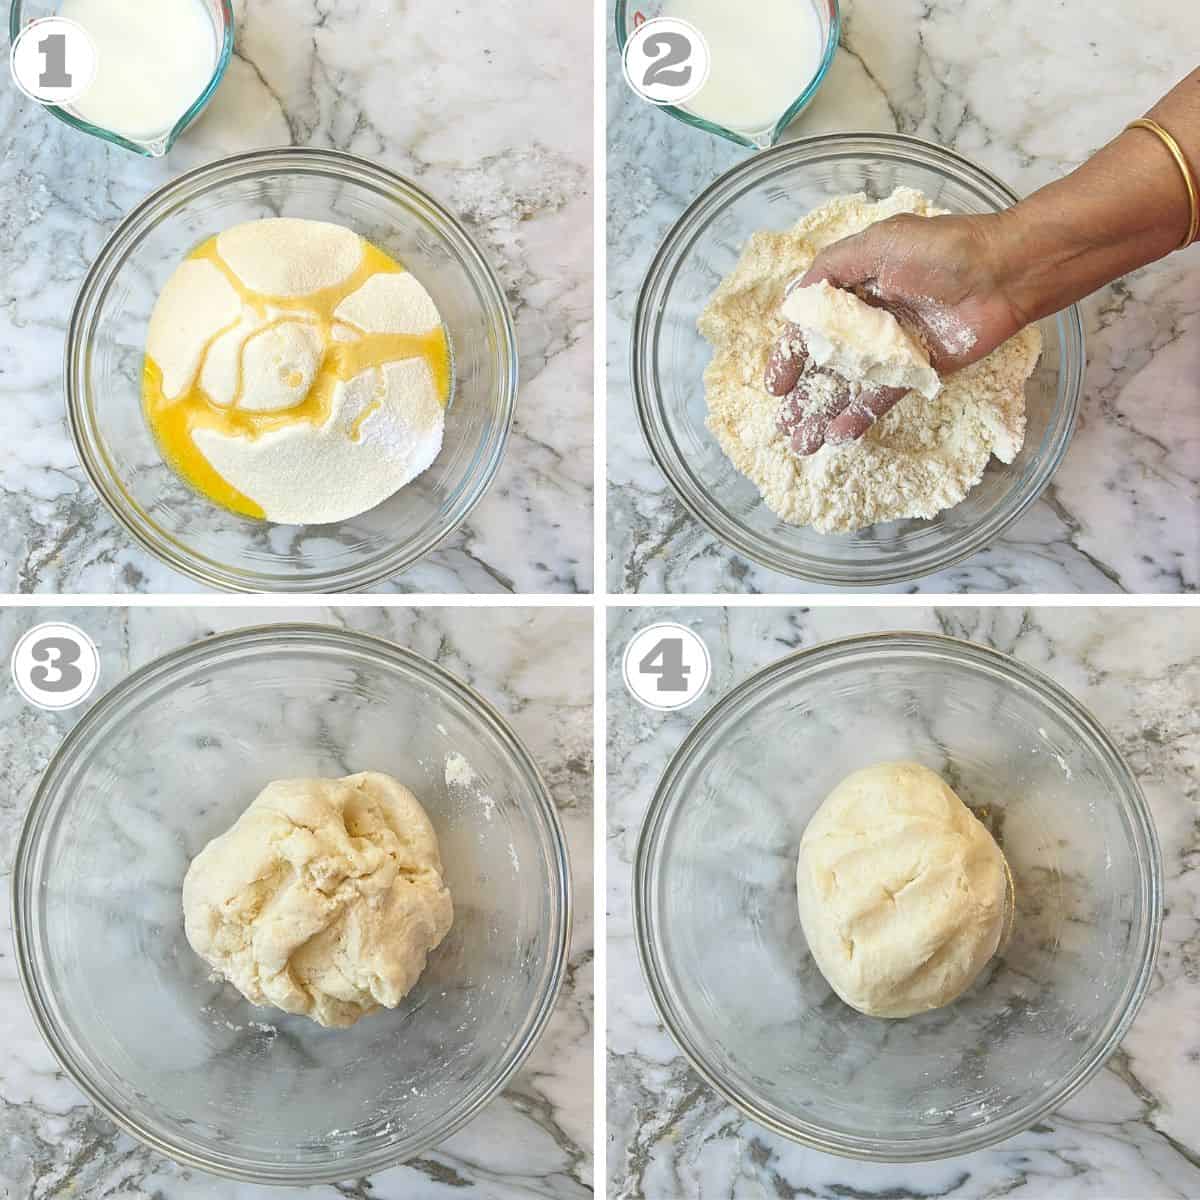
Knead The Dough
- Mix semolina and all-purpose flour. Heat the ghee and add it to the flour
- Massage the ghee into the flour for 3 to 4 minutes or until you can form a loose ball with the dry flour
- Next, knead the dough with warm milk
- Cover and allow the dough to rest for 20 mins
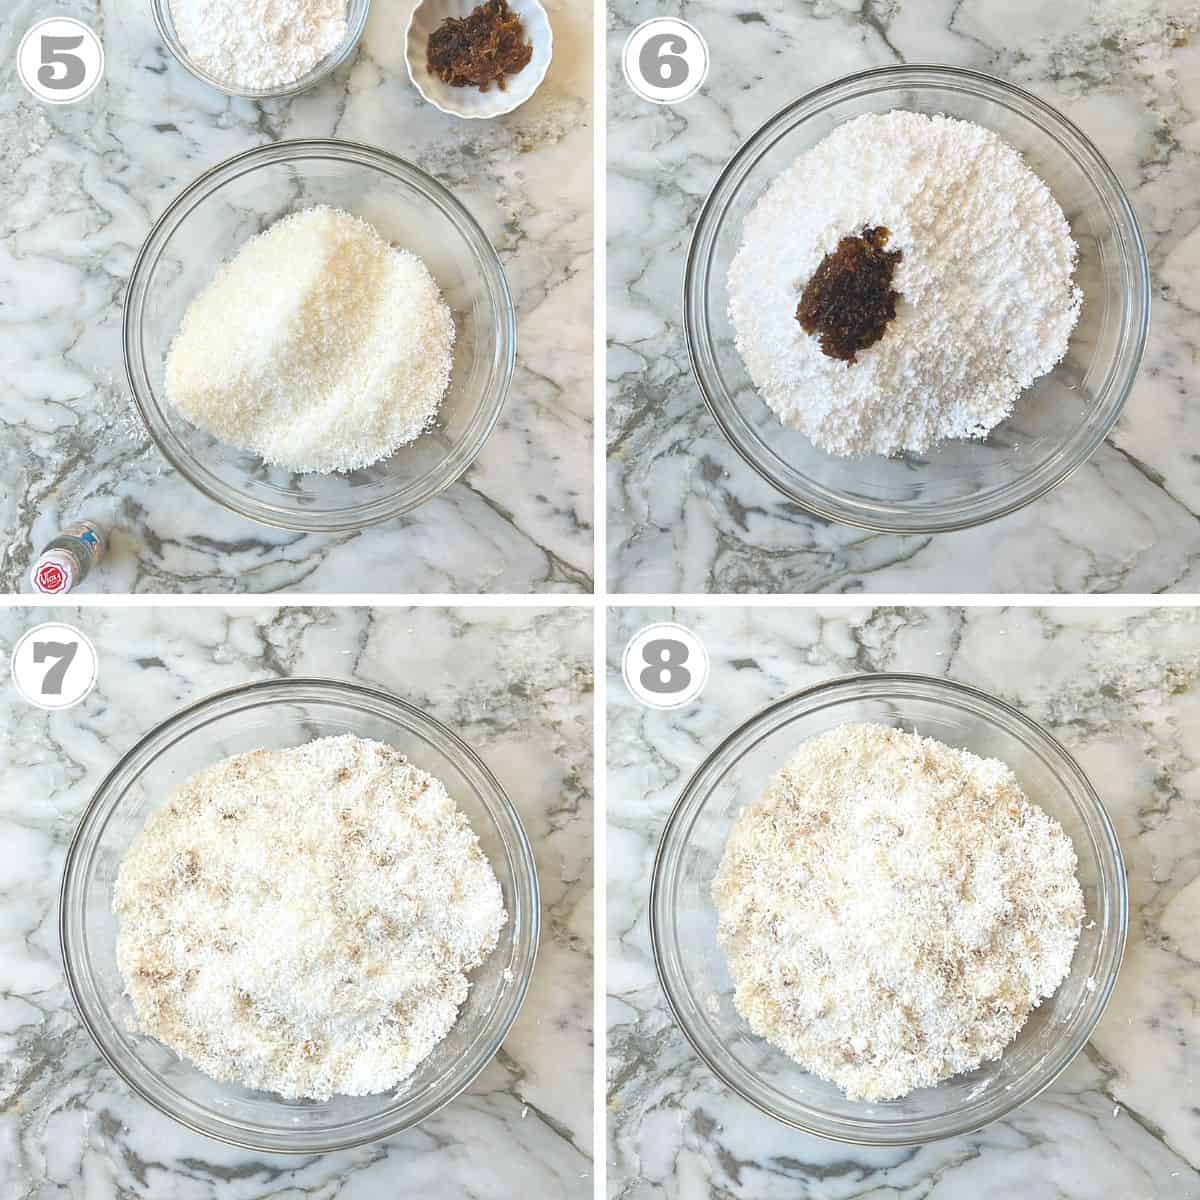
Make the Filling
- Add all the ingredients for the filling to a mixing bowl.
- Rub filling on the palms of the hands for a couple of minutes so that the rose preserve is mixed evenly.
Layering Paste and Color (Optional Step)
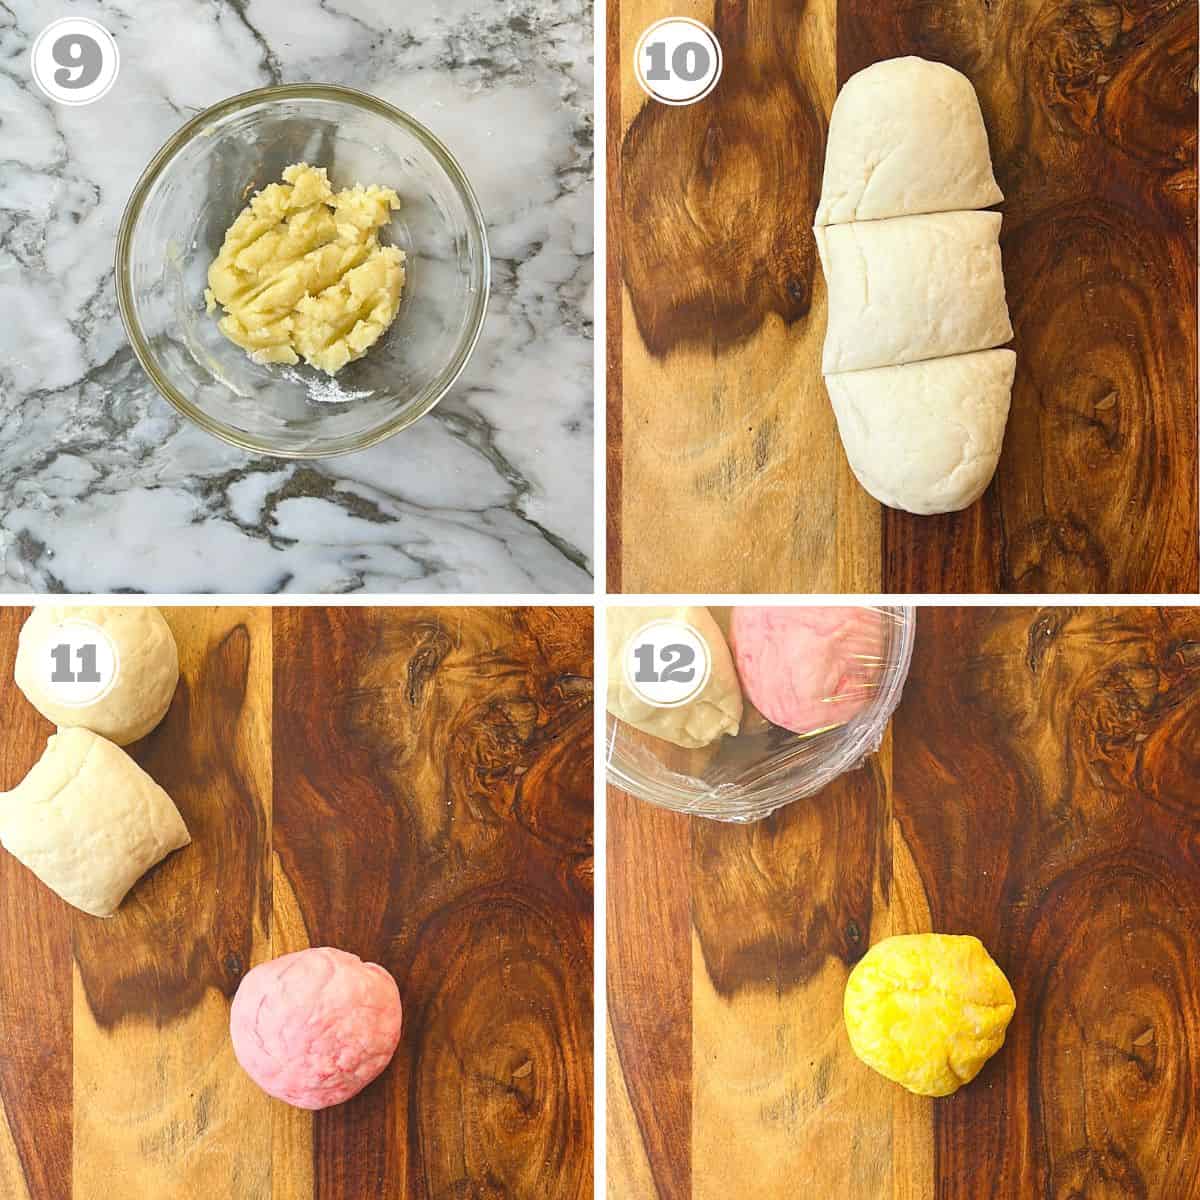
- Make the layering paste AKA "Sata" by mixing rice flour and ghee. Reserve.
- Divide the dough into 3 equal parts.
- As ⅓ of the dough will be left white, knead this ball of dough first so there is no color transfer from the next step. Knead for 2-3 minutes.
- Bloom saffron in warm milk and add it to the second part. Knead well for 5 minutes until the color is evenly distributed.
- Add a teaspoon of beet juice (or a few drops of red coloring) to the final piece and knead well for 5 minutes or until the color is evenly distributed.
Roll the Dough and Apply Sata Between Layers (optional)
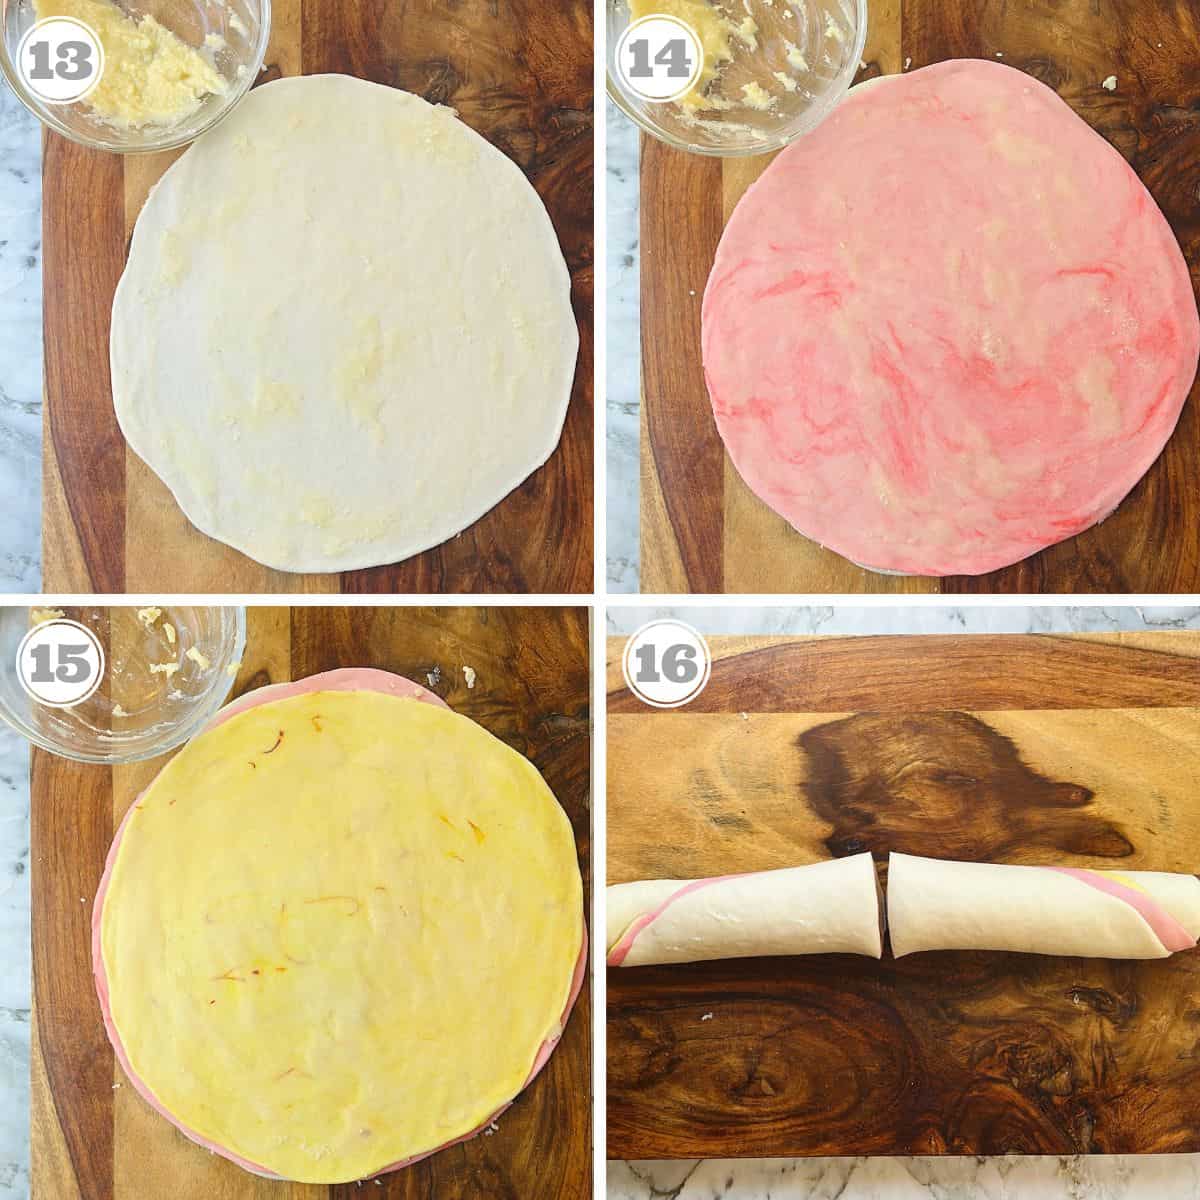
- Roll each of the dough into a thin 12-inch circle. Evenly spread one-third of the rice flour paste over the white rolled circle.
- Place red over the white and apply a thin layer of rice flour paste.
- Lastly, place the yellow dough and apply a thin layer of rice flour paste.
- Make a tight roll of the layered dough and cut it in half
Roll The Dough, Fill and Seal
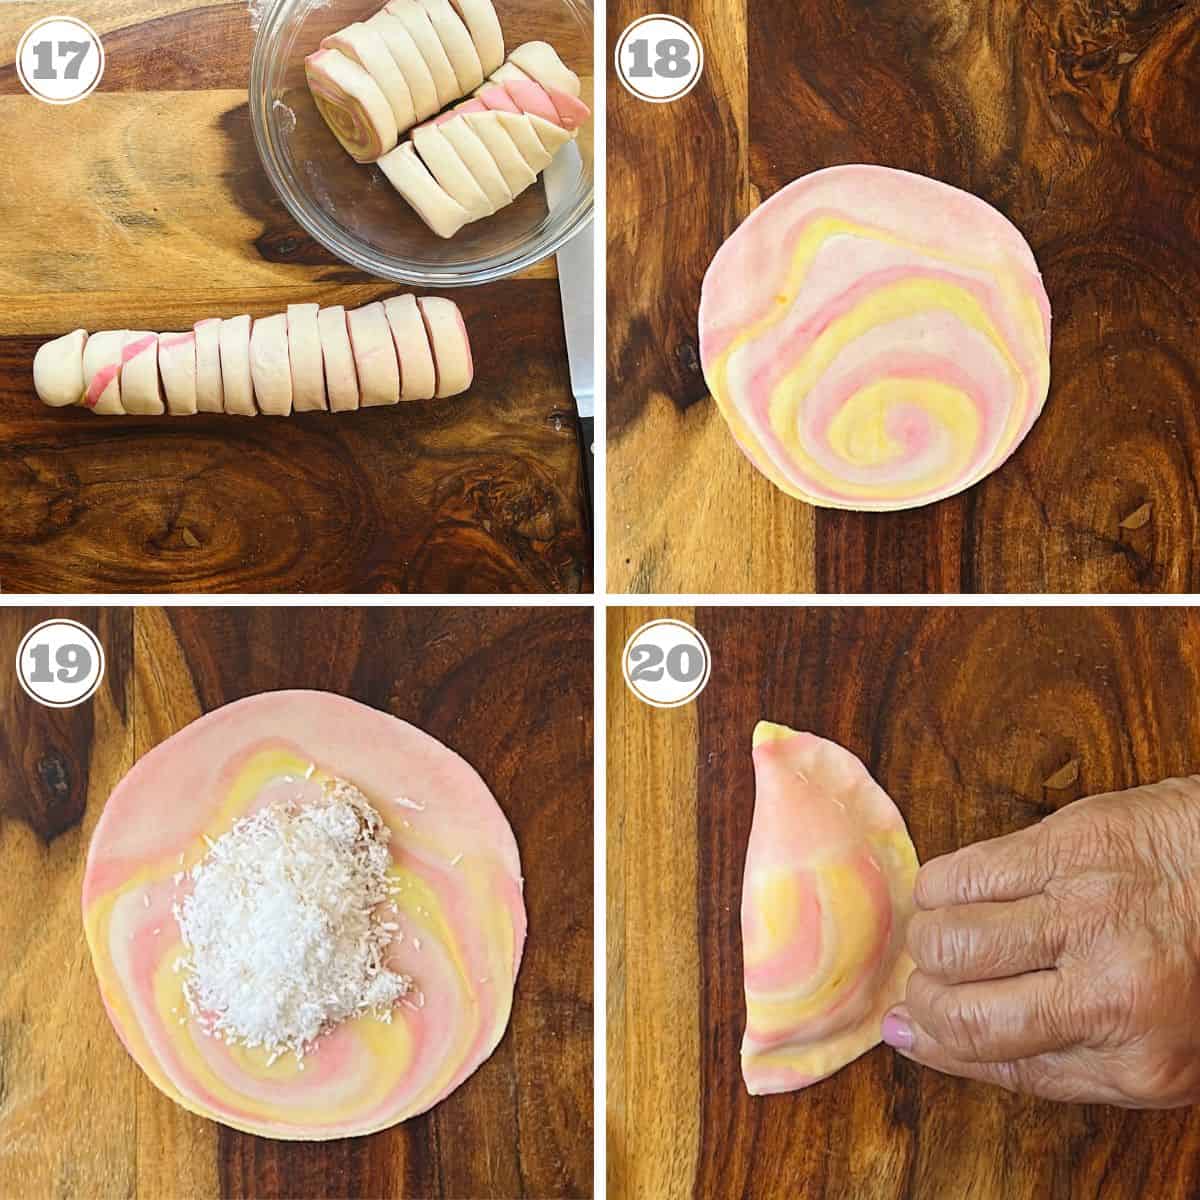
- Roll each half to even out the thickness, and then cut each half into 12 pieces or ¼ inch discs.
- Take one cut piece and roll it into a 3-inch circle. While rolling, press the outer white edge forward so the outermost layer is on the top/front. With the layers overlapping each other and the disc forming an oval shape. This step is very important as it keeps the layers together while rolling. Do not flatten the disk at its center by pressing on the top, as the layers may start opening as you roll them.
- Place a tablespoon of filling in the center. You can do this on a board, or it's also easier to pick up the rolled dough on the palm of your hand and add filling to the center
- Apply, little milk on the edges using your finger. Then, fold the circle over to form a semi-circle with the edges sealing the filling inside. I prefer picking up the disc in my hand rather than adding the filling and sealing. Although it can also be done on a board.
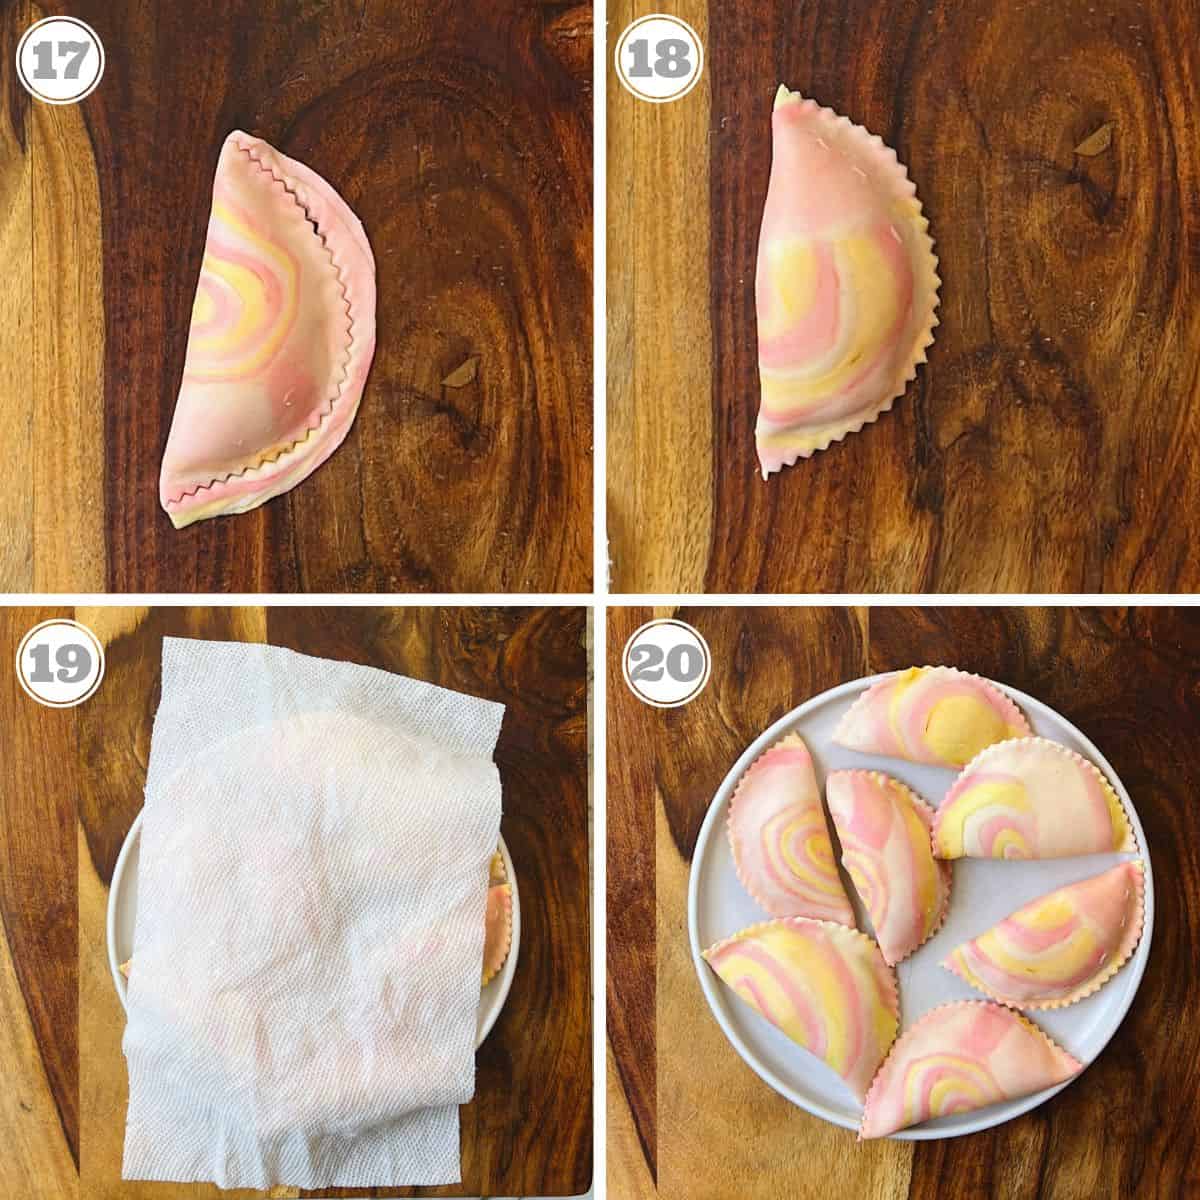
Shape the Karanji and Discard Excess Dough
- Once the karanji is sealed firmly, use a spiral pastry cutter to cut some of the excess dough and shape the karanji. This step is entirely optional. You can also fry the sealed karanji as is. You can also use a fork to press the edges to form a pretty pattern, or the edges can also be folded into tiny pleats.
- Repeat rolling, filling, sealing, and shaping the remaining dough.
- Keep the shaped karanji covered under a lightly wet paper towel
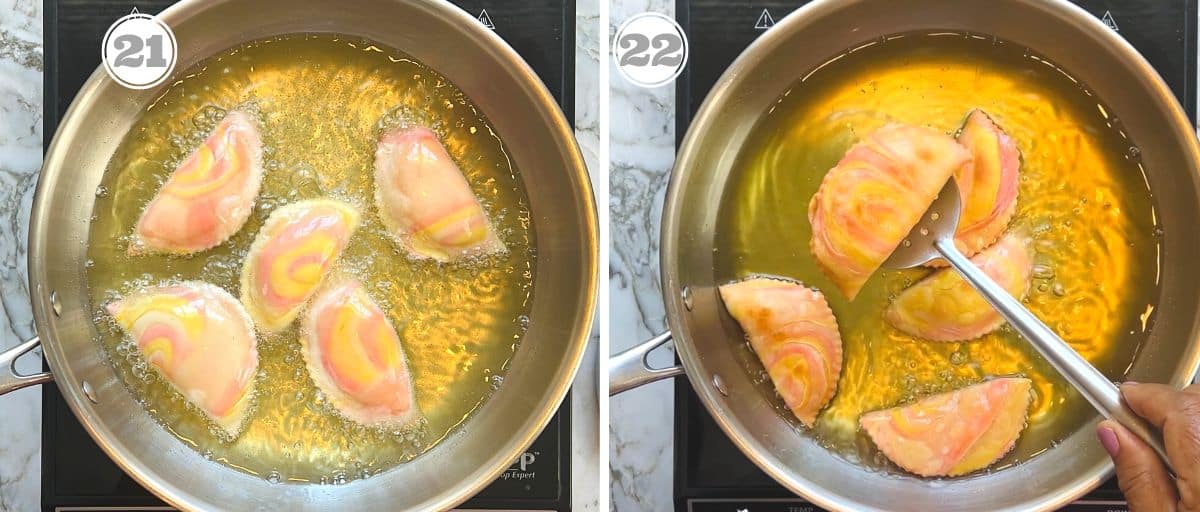
Fry the Karanji
- After all the karanjis are ready. Add oil to a frying pan on medium-high heat.
- Once the oil is hot, add 4 to 5 karanjis, fewer depending on the size of your frying pan. Lower the heat to medium-low and fry for 4-5 minutes, turning once halfway through. If they start to brown sooner, lower the heat further.
How to Store Karanji
Allow the Karanji to cool down completely and then store them in an airtight container for up to two weeks
★ Tried this recipe? I'd love to hear how it turned out! Leave a comment and let me know, or snap a quick pic and upload it-I love seeing your creations. If you're on Instagram, tag @ministry_of_curry so I can check it out. Your feedback means so much to me and makes all the time I spend perfecting each recipe totally worth it. Thank you!
Recipe

Rose Coconut Karanji {crispy pastry with sweet rose flavoured coconut filling}
Recipe Video
Ingredients
Filling
- 2 cups dessiccated unsweetened coconut
- 1 cup powdered sugar
- 1 tablespoon gulkand/rose preserve
- 1 teaspoon rose essence
Outside Cover
- 1½ cups fine rava/semolina
- 1½ cups all purpose flour
- 1 cup milk warm
- 2 tablespoons ghee
- oil for frying
Layering (optional, see notes)
- 2 tablespoons rice flour
- 2 tablespoon butter melted
Other Optional Ingredients
- 1 teaspoon beet juice grate a small piece of beet and squeeze out the juice or use few drops of red food coloring
- 1 pinch saffron
- 1 teaspoon milk warm
Instructions
Make the dough for outer covering
- Mix semolina and all-purpose flour. Heat ghee and add to the flour. Massage the ghee to the flour for 3 to 4 minutes or until you can form a loose ball with the dry flour. Kneading dough by adding milk as needed to form a firm dough ball. Note: Depending on the rava, you may need more or less to make a firm dough. Allow the dough to rest for 20 mins.
Make the filling
- Mix all the ingredients for the filling. Rub filling on the palm of the hands for a couple of minutes so that the rose preserve is mixed evenly. Reserve.
Layering Paste and Coloring the Dough (optional)
- Make the layering paste (Sata) by mixing rice flour and ghee. Bloom saffron in warm milk.
- Divide the dough into 3 equal parts. As ⅓ of the dough will be left white, knead this ball of dough first so there is no color transfer from the next step. Knead for 2-3 minutes. Add bloomed saffron to the second part. Knead well for 5 minutes until the color is evenly distributed. Add a teaspoon of beet juice (or a few drops of red coloring) to the final piece and knead well for 5 minutes or until the color is evenly distributed.
- Roll each of the dough balls into a thin 12-inch circle. Evenly spread one-third of the rice flour paste over the white rolled circle. Place red over the white and apply a thin layer of rice flour paste. Lastly, place the yellow dough and apply a thin layer of rice flour paste. Make a tight roll of the layered dough and cut it into half
- Cut the roll into half and then cut each half into 1-inch discs (total 24 )
- Take one disc and press the outer white edge forward so that the outermost layer is on the top with the layers overlapping each other and the disc forming an oval shape. This step is very important as it keeps the layers together while rolling. Do not flatten the disc at its center by pressing on the top as the layers may start opening as you roll them.
Roll the Dough, Fill, Seal and Shape
- Next, roll the flattened disc into a 3-inch circle. Place a tablespoon of filling in the center. Apply a little milk to the edges using your finger and then fold over to form a semi-circle with the edges sealing the filling inside. I prefer picking up the disc in my hand and then adding the filling and sealing but it can also be done on a board.
- Once the karanji is sealed firmly, use a spiral pastry cutter cut some of the excess dough and shape the karanji. This step is completely optional. You can also fry the sealed karanji as is. You can also use a fork to press the edges to form a pretty pattern or the edges can also be folded into tiny pleats.
- Repeat rolling, filling, sealing, and shaping the remaining dough. Keep the shaped karanji covered under a moist paper towel
- After, all the karanjis are ready. Add, oil to a frying pan on medium-high heat
Fry the Karanji
- Once the oil is hot, add 4 to 5 karanjis, less depending on the size of your frying pan. Lower the heat to medium-low and fry for 4-5 minutes turning once halfway through. If, they start to brown sooner, lower the heat further.
Storing
- Allow the Karanji to cool down completely and then store them in an airtight container for up to two weeks
Notes
Nutrition
♥ We LOVE to hear from you! Tried this recipe? Please share your food photo with hashtag #ministryofcurry on Facebook or Instagram, so we can see it and our followers can enjoy it too! Thank you and Happy Cooking
♥ Subscribe to our Youtube Channel for tasty and easy video recipes. Looking for more Instant Pot recipes? Check out our delicious Instant Pot Recipe board on Pinterest.
Arohii says
Wow recipe !! ?
Archana says
Thank you Arohi! Happy Diwali!!
Arohii says
Welcome dear...wish you and yours a very happy Diwali too ???? xx
Archana says
Thank you!
M Leybra says
Exquisite. Where can I buy, pay someone to make for me?
Archana says
Thank you! Not sure where you are located. But some Indian dessert shops may sell a variation of this.
Divya says
Unique, delicious & so inviting Archana! I'm so eager to try this:)
Archana says
Thank you Divya! Please do, I am sure you will love it. Happy Diwali!!
Indu says
Oh my gosh, Archana! Stunning presentation! I am drooling 🙂 Happy Diwali to you!
Archana says
Thank you Indu! You know they are coming your way soon.. Happy Diwali!!
Indu says
Looks wonderful! Great idea with doing layering if colors in the dough. Lot of effort but I am sure worth it! Happy Diwali to you!
Archana says
Thank you Indu!! Worth every minute, also it's one of those recipes that is fun to make! Happy Diwali!
fravitch says
Wow! Beautiful and yummy dish!! Your directions are thankfully easy to understand 🙂 I should try!!
Archana says
Thank you! Please let me know if you make them, they are delish!!
Tali says
looks beautiful! I'm sure it's also yummy 🙂
Archana says
Thank you Tali! It tastes heavenly.
Cook with Smile.. says
I haven't seen this layered karanji... you give your unique touch in your recipes... looks great Archana?.. Happy Diwali?
Archana says
Thank you Lathi! Happy Diwali!
Jyoti's Kitchen says
Yummy and delicious!
Happy diwali!
Archana says
Thank you Jyoti!
payel says
Awesome recipe!
Archana says
Thank you Payal!
deliciouslynell says
How pretty! I love the layering!
Archana says
Thank you!!
Nandini says
Lovely recipe 🙂
Archana says
Thank you Nandini!
Summer Daisy says
Must be tasty and satisfying ♥
Archana says
They sure are! Thank you for stopping by.
chestnutandacorn says
These are so interesting and unique!
Archana says
Thank you. They sure are and taste heavenly!
Cattie's World says
Reading this Recipe and looking at the pics to explain them was so appetising !! By the time, I reached the bottom of the post, I found my mouth watering and a crave to bite into these pics and feel that Crunchy Coconut filled sweet and then eat more and more and more..........................Till I saturate.
Thank You so much for the Recipe and Well Explained Pics.
Love
Archana says
Thank you Cattie for your kind words. It is my favorite Diwali sweet for sure.
cookwithchloeblog says
wow,true talent. looks amazing and i am sure it taste amazing I am 11 and have a dream of getting 500 or more followers PLEASE PLEASE PLEASE follow me thanks
Hilda says
I believe Diwali has passed, but I would love to make these anyway. Thanks for a beautiful and clearly explained recipe.
Archana says
Thank you Hilda! These require very few ingredients and they come out absolutely delish!!
Cattie's World says
I gave the recipe printout to my maid and asked her to follow the instructions and make it. And when I saw it, it was like those fried stuffed bhajias. The only thing delicious about them was the sweet fillings. But the crust was ruined. Actually if you can make a video of this, I will follow it better.
But I've not given up making this. This time, I'll supervise.
Archana says
Cattie, first thank you for trying the recipe and your feedback. I am sorry that the outer did to come out good.
Here are a few suggestions - Make sure the outside dough is firm and well kneaded. Sometimes if the semolina is coarse you can also beat the dough for 5 minutes before rolling with a pestle. This makes the dough even and soft.
For frying, as you are putting them in the oil the oil should be very hot but then after you have immersed them in lower the heat and fry on low flame. Don't rush the frying. I will surely try to put a video for this. Thanks again!
momsrecipediary says
They look so pretty and delicious!!
Archana says
Thank you!
cookingwithauntjuju.com says
The layering of the colored pastry is just beautiful - what a great idea. I always like it when a rose flavoring is added.
Archana says
Thank you! I love everything with rose flavors too ❤️