

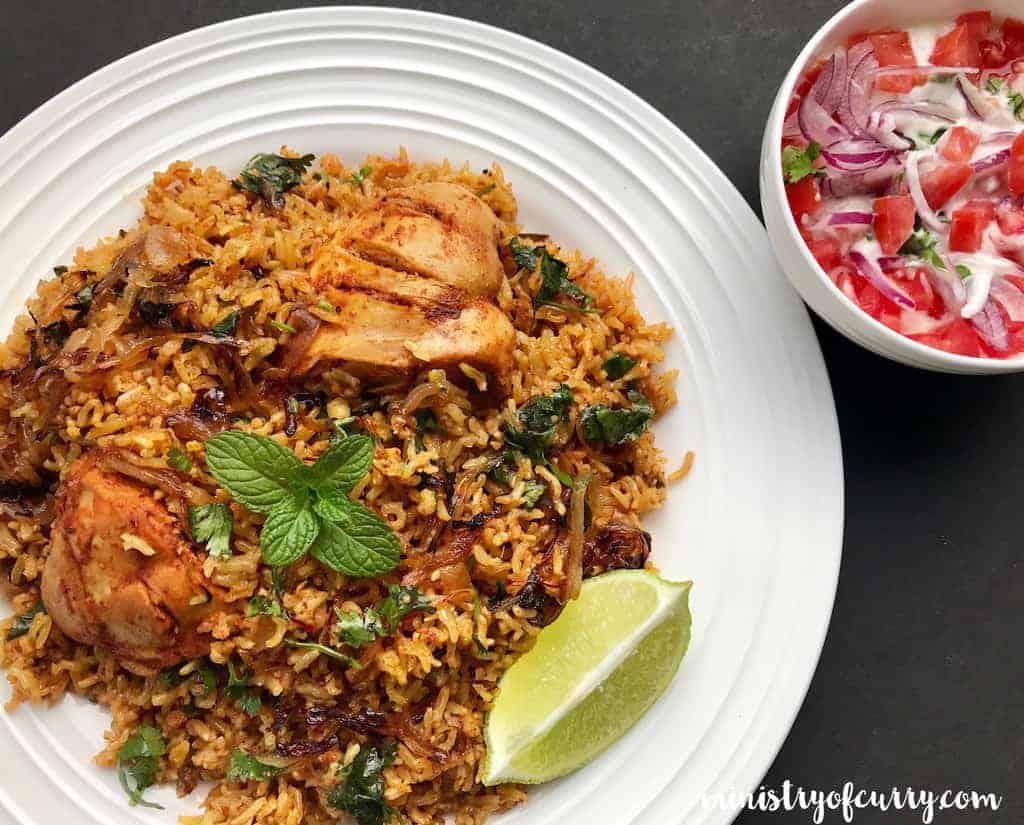
This Brown Rice Chicken Biryani is a healthier version of my popular Chicken Biryani. It is cooked with brown basmati rice, chicken breasts, fresh herbs, and warm aromatic spices. Served with cooling raita, this is a fav feel-good comfort food!

Want to Save This Recipe?
Enter your email & I'll send it to your inbox. Plus, get great new recipes from me every week!
By submitting this form, you consent to receive emails from Minstry of Curry
After posting my Instant Pot Chicken Biryani recipe, I received so many questions on how to make this with brown rice. My initial thinking was that it is not going to work out with the flavors and the textures of the chicken and Rice cooking together.
Then I started experimenting with brown rice. The more I started cooking with it, the more I figured out that soaking it can drastically change the cooking time, especially with an Instant Pot. After a few tries, I was able to come up with this recipe that has tender, cooked chicken with perfectly cooked brown rice.
I would have never thought of making Biryani with brown rice if not for you guys, so THANK YOU!! This delicious biryani is now on repeat in my kitchen.

Ingredients
- Brown Rice - brown basmati or jasmine rice
- Chicken - I have used lean chicken breasts in this recipe. Chicken thighs or drumsticks also work well.
- Aromatics - yellow onion, fresh ginger, and garlic
- Spices - bay leaves, cumin seeds, whole black peppercorns, turmeric, red chili powder, and garam masala. You can always add more spices such as whole cloves, star anise, and cardamom if you like
- Yogurt - plain unsweetened yogurt works as a perfect base for the marinade
How to Make Brown Rice Chicken Biryani
1. Soak the Rice and Marinate the Chicken
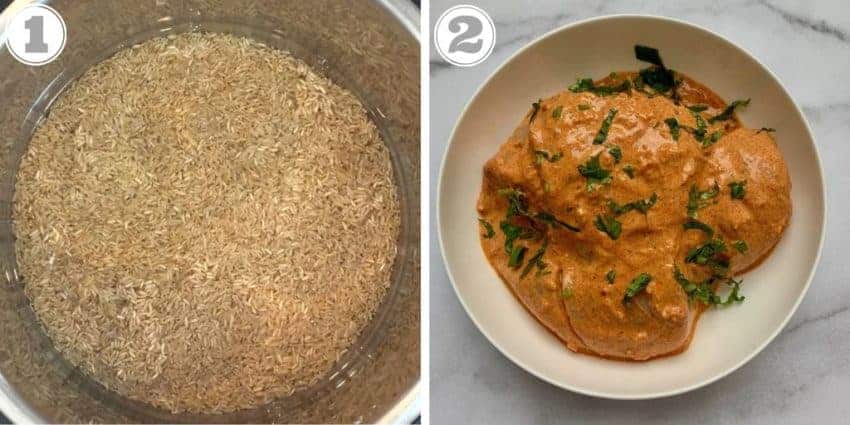
- Rinse and drain the brown basmati rice thoroughly 2 times. Add 2 cups of warm water and soak the rice for 3 hours. (photo 1)
- Make the marinade by mixing garam masala, ginger, garlic, red chili powder, turmeric, mint leaves, half of the chopped cilantro, lemon juice, yogurt, and salt. Add chicken and coat evenly with the marinade. Keep in the refrigerator for 2-3 hours. (photo 2)
2. Caramelize Onions
- Turn Instant Pot to Saute(Hi) mode and add half of the ghee. Add thinly sliced onions (photo 3)
- Cook stirring frequently for 10 to 12 minutes or until the onions are golden brown and caramelized. Take out half of the onion and keep it aside for garnishing the biryani (photo 4)

3. Sauté Marinated Chicken and Deglaze
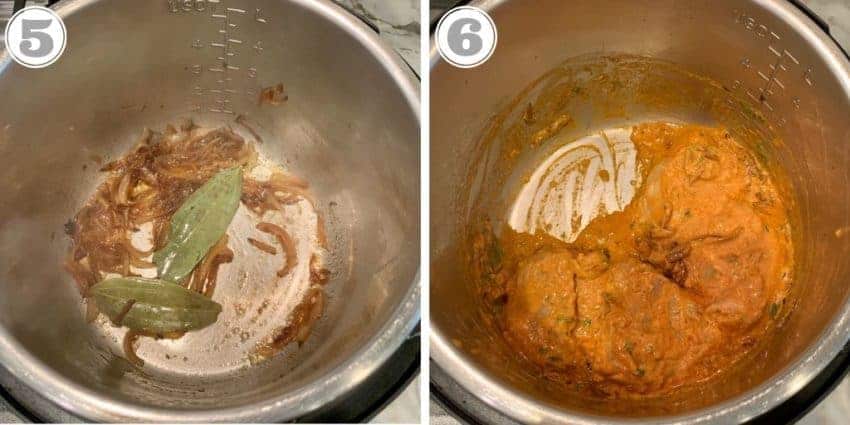
- Add the remaining ghee to the Instant Pot with half of the caramelized onions already in the pot. For extra spicy Biryani, add sliced jalapeno. Add bay leaves. (photo 5)
- Add marinated chicken and mix well. Deglaze the pot with the liquids from the marinade. The deglazing step is important and will help prevent the browning of the pot from sautéing the onions (photo 6)
4. Layer Rice and Pressure Cook
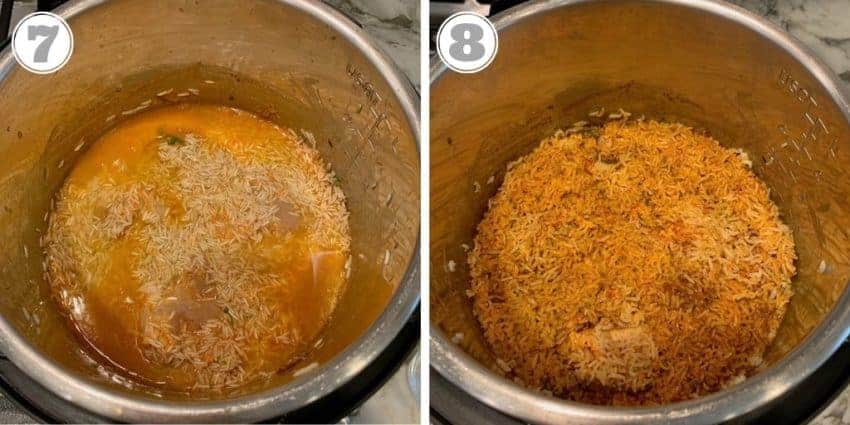
- Drain the rice and gently pour it over the chicken. Spread the rice evenly over the chicken. Add 1-½ teaspoon of salt. Add 1 cup of water. (photo 7)
- Using a spatula, evenly spread the rice under water and gently push all the rice from the sides of the pot under the liquid. (photo 8)
- Close the Instant Pot and turn the pressure valve to sealing. Set to Manual mode for 10 mins. Allow Natural Pressure Release.
- Open the Instant Pot and gently fluff the top layer of the rice. If it looks slightly uncooked, simply close the Instant Pot and leave it on the keep-warm mode for another 10 minutes.
5. Garnish
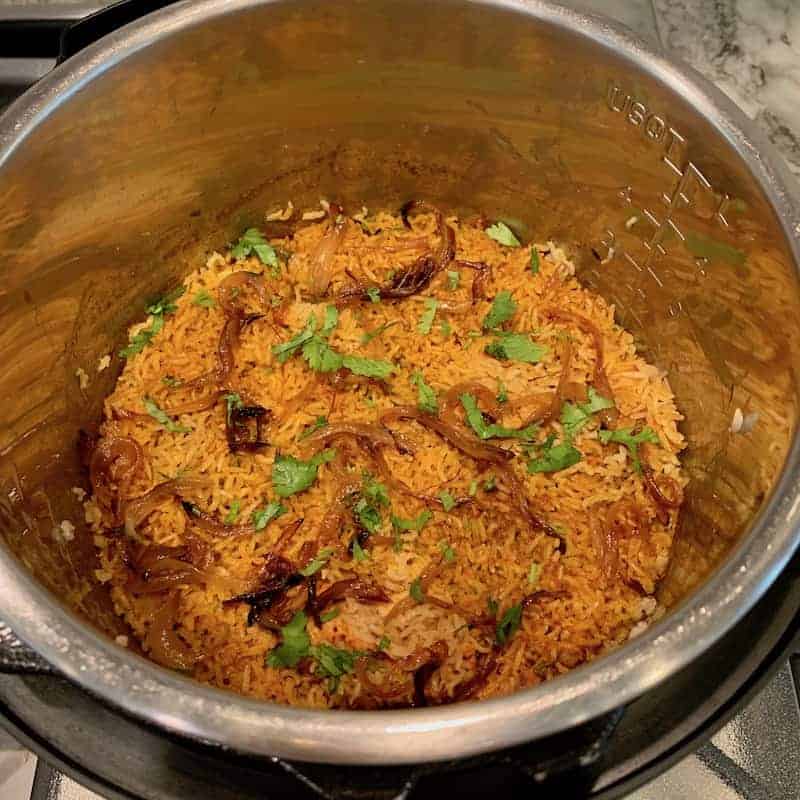
- Garnish with the remaining caramelized onions, saffron, and cilantro.
Serving
Serve with yogurt-based raita, boiled egg, and a fresh lime wedge! I love serving Mango Lassi or homemade lemonade with this Biryani. It can also be refrigerated for up to 5 days. To reheat, simply microwave.
Pro Tips for the Best Brown Rice Chicken Biryani
- Soak the brown rice for 3 hours in warm water.
- Pat dry the chicken before marinating to avoid excess liquids. Marinate chicken breasts for at least 2-3 hours. Chicken can also be marinated overnight or for up to 12 hours
- Use plain full-fat yogurt for the marinade.
- Use fresh garam masala. Homemade garam masala works the best!
- Make sure all of the rice is under the liquids before closing the Instant Pot.
- It is normal for the top layer of the rice to look a bit undercooked. Simply fluff the top layer and then gently mix the biryani with a silicone spatula.
- This recipe makes medium spicy Biryani. For extra spicy, add jalapeno. OR add another teaspoon of garam masala to the chicken.
- Lastly, although the Sauté function on the Instant Pot works great for true one-pot cooking, you can also caramelize the onions using a stovetop in a non-stick pan. OR you can also air fry the onions. This will speed up the process and also prevent the stainless steel insert from getting scorched, which may lead to a "BURN" notice on the newer Instant Pots.
- Allow natural pressure release so the rice continues to cook and the chicken breasts cook tender and juicy
Chicken drumsticks or chicken thighs can also be used in this recipe with the same pressure cook time
How to avoid the BURN
- Make sure your recipe has enough thin liquids
- Make sure that the liquids have not evaporated by the time you close the lid
- Make sure the sealing ring is on and properly secured. If your sealing ring has become loose, place it in the freezer for an hour.
- Lastly, deglaze the pot. In this recipe, after the onions are sautéed, the bottom of the pot may get browned. So it is important to remove this browning, which is called deglazing the pot. Turn the sauté mode off, and either using some of the marinated chicken or 2 tablespoons of water, scrape the bottom of the pot with a wooden spatula. This will remove any browned bits from the sautéing of the onions. This is an important step, especially for Biryani recipes, and will help the Instant Pot come to pressure and also prevent the "BURN" signal.
★ Tried this recipe? I'd love to hear how it turned out! Leave a comment and let me know, or snap a quick pic and upload it-I love seeing your creations. If you're on Instagram, tag @ministry_of_curry so I can check it out. Your feedback means so much to me and makes all the time I spend perfecting each recipe totally worth it. Thank you!
Recipe

Brown Rice Chicken Biryani - Instant Pot
Recipe Video
Ingredients
Marinade
- 2 teaspoons garam masala
- 1 tablespoon ginger grated
- 1 tablespoon garlic grated
- 1 tablespoon kashmiri red chili powder
- ½ teaspoon ground turmeric
- ¼ cup mint leaves
- ¼ cup chopped cilantro divided
- 2 tablespoon lemon juice
- ¾ cup plain yogurt
- 2 teaspoon kosher salt
- 2 pounds chicken breasts cut each breast into 2 pieces
Remaining Ingredients
- 2 cups brown basmati rice
- 1 jalapeno sliced into 8 wedges optional for extra spicy **
- 2 tablespoons ghee divided
- 1 large onions thinly sliced
- 2 bay leaves
- 1½ teaspoon kosher salt
- 1 teaspoon saffron mixed in 1 tablespoon warm milk
- 4 boiled and shelled eggs optional
Instructions
- Rinse and drain the brown basmati rice thoroughly 2 times. Add 2 cups of warm water and soak the rice for 3 hours.
- Make Marinade by mixing garam masala, ginger, garlic, red chili powder, turmeric, mint leaves, half of the chopped cilantro, lemon juice, yogurt and salt. Add chicken and coat evenly with the marinade. Keep in the refrigerator for 2-3 hours
- After about 2-½ hours, turn Instant Pot to Saute(Hi) mode and add half of the ghee. Add thinly sliced onions, cook stirring frequently for 10 to 12 mins or until the onions are golden brown and caramelized. Take out half of the onion and keep it aside for garnishing the biryani.
- Add remaining to the Instant Pot with half of the caramelized onions already in the pot. For extra spicy Biryani add sliced jalapeno. Add bay leaves and marinated chicken. Mix well and deglaze the pot with the liquids from the marinade. The deglazing step is important and will help take out the browning of the pot from sautéing the onions. Note: If you have an air fryer you can use it or perfect golden fried onions.
- Drain the rice and gently pour over the chicken. Spread the rice evenly over the chicken. Add 1½ teaspoon of salt. Add 1 cup of water.
- Using a spatula, evenly spread the rice under water and gently push all the rice from the sides of the pot under the liquids.
- Close Instant Pot and turn pressure valve to sealing. Set to Manual mode for 10 mins.
- Allow Natural Pressure Release. Once the pin drops, open the Instant Pot and gently fluff the top layer of the rice, if it looks slightly uncooked, simply close the instant pot and leave the Instant Pot on the keep warm mode for another 10 minutes.
- Gently fluff and mix the rice with the chicken on the bottom of the pan.
- Garnish with the remaining caramelized onions, saffron and cilantro.
- Serve with Raita (Onions and tomatoes mixed in yogurt), hard boiled egg and lemon wedges.
Notes
- Marinade the lamb using the same ingredients as the chicken. Here are 2 options to adjust cook time for Lamb Biryani:
- Pressure Cook the marinated lamb for 20-25 mins on the meat/stew setting. Then add the soaked brown rice and follow the remaining recipe.
- Pressure Cook the marinated lamb for 15 mins on the meat/stew setting. Then add unsoaked brown rice, with an extra ½ cup of water, and cook for 20 mins with natural pressure release.
Nutrition
♥ We LOVE to hear from you! Did you try this recipe? Please share your food photo with hashtag #ministryofcurry on Facebook or Instagram, so we can see it and our followers can enjoy it too! Thank you and Happy Cooking ♥ Subscribe to our Youtube Channel for tasty and easy video recipes. Looking for more Instant Pot recipes? Check out our delicious Instant Pot Recipe board on Pinterest.
Update Notes: This recipe was originally posted in Nov 2017, but was updated in Oct 2019 with new photos and information.


Maria Smith says
Hi
Is there a way I could convert this to a vegetable dish with no meat?
Thanks
Maria
Archana says
Here are 2 of my Biryani recipes with no meat - https://ministryofcurry.com/vegetable-paneer-biryani-instant-pot/ and https://ministryofcurry.com/chickpea-biryani-instant-pot/
Maria Smith says
Brilliant.
Thank you!
Anand Sathe says
I have insta pot Ultra 60. When the recipe says saute (High) i don't see that setting on my Insta pot. Also there is no Manual setting. I used my own judgement and the biryani turned out great. If you can suggest the alternate setting for Ultra 60 it will be helpful. Thanks
Archana says
So Manual setting in your Instant Pots is called Pressure Cook and you can use the default sauté option
Deepika says
What would be water proportion for brown regular rice
Archana says
same water ratio!
Doe says
Can I add veg with the chicken to boost nutrition? Red pepper and carrots for example.
Thanks
Archana says
Yes! They will be cooked soft but will boost nutrition.
Laura says
Hello, could I add potatoes to the chicken as well?
Archana says
Yes, you can. I would layer them just before adding the rice. .
Danielle says
Thank you so much for this recipe! I just made it for the first time and had to make a couple substitutions with what I had on hand (sour cream and nonfat yogurt, siracha and paprika for chili powder, boneless skinless thighs) and had to let it sit for about 1:30 on keep warm before I could get to it… and OH MAN is it good!!!! The rice is a bit mushy, probably because I was nervous about not having enough liquid so I added a little more water, but it’s still delicious! I’m looking forward to making this again and again and perfecting it!
Archana says
Thank you for your detailed review. I am SO glad you enjoyed it and I feel soft well cooked brown rice is so satisfying!
Renee says
This is a great recipe. I used it for meal prep all week and didn't get bored of it come Friday. I even had some extra to toss in the freezer. I did bonless, skinless chicken breasts, had to use sour cream instead of yogurt, didn't have mint leaves and I HATE cilantro so left that out. Even having lacked some of the ingredients, it was still delicious. I am very picky about how I cook my brown rice because there is a specific texture I like, and the rice came out perfectly! For those who feel they need to add more water to the pot, DON'T. It doesn't look like enough liquid, but it is the perfect amount.
Archana says
Thank you for the detailed feedback.
Sonia says
Can I use non-dairy yogurt? If so, do you have recommendations?
Archana says
Yes. You can use use any brand you like.
Liane says
Hi. I love your white rice biryani but am looking forward to making this one with brown basmati. I have an 8 quart instant pot and was hoping to double the recipe. Are there any adjustments I should make? Thanks.
Archana Mundhe says
Hi Lianne, You can double this recipe as is in an 8 QT instant pot.