


Instant Pot Chicken Biryani is one of my favorite dishes and one of the most requested meals at my house. This one-pot meal is made of fragrant basmati rice, tender spiced chicken, and caramelized onions, and it can be cooked in less than an hour while maintaining the same authentic flavor and texture of traditional biryani.

Want to Save This Recipe?
Enter your email & I'll send it to your inbox. Plus, get great new recipes from me every week!
By submitting this form, you consent to receive emails from Minstry of Curry
Family Treasured Recipe
Biryani is one of India's most beloved dishes; rich in flavor and tradition, but often time-consuming to make. Growing up, my mom's Stovetop Chicken Biryani was a special treat, and I knew I had to find a way to bring that same magic to busy weeknights.
After a few trials, I cracked the Instant Pot version that is quick, easy, and full of authentic flavor.
Since then, I've had so much fun creating more one-pot biryanis you'll love: From fragrant Vegetable Biryani, Shrimp Biryani to hearty Chickpea Biryani (with vegan options!), Brown Rice Biryani, Fish Biryani, and Egg Biryani there's something for everyone, and all made effortlessly in the Instant Pot!
The Famous Instant Pot Chicken Biryani
Thank you to all who have tried this recipe. It has become so popular that when I published The Essential Indian Instant Pot Cookbook, I was requested that I also include this recipe in the cookbook. I hope you will enjoy 75+ modern recipes with authentic Indian flavors in my best-selling book.
How To Cook Different Chicken Cuts
I love biryani with chicken cooked tender and moist, while the rice is fluffy with each grain separated. There are 2 ways to cook biryani, depending on your chicken cut.
- Using bone-in, skinless chicken legs, I first partially cook the chicken by pressure cooking it for 4 minutes. Then layer over soaked and drained rice and pressure cook both chicken and rice for 6 minutes.
- Using small bone-in chicken pieces or boneless thighs - Skip the initial 4 minutes of pressure cooking and saute the marinated chicken for 2 to 3 minutes. Then layer the soaked and drained rice and pressure cook for 6 minutes.

How to Make Instant Pot Chicken Biryani
Here are step-by-step instructions with photos. Please check the printable recipe card at the end of this post for the ingredient quantities and detailed instructions.
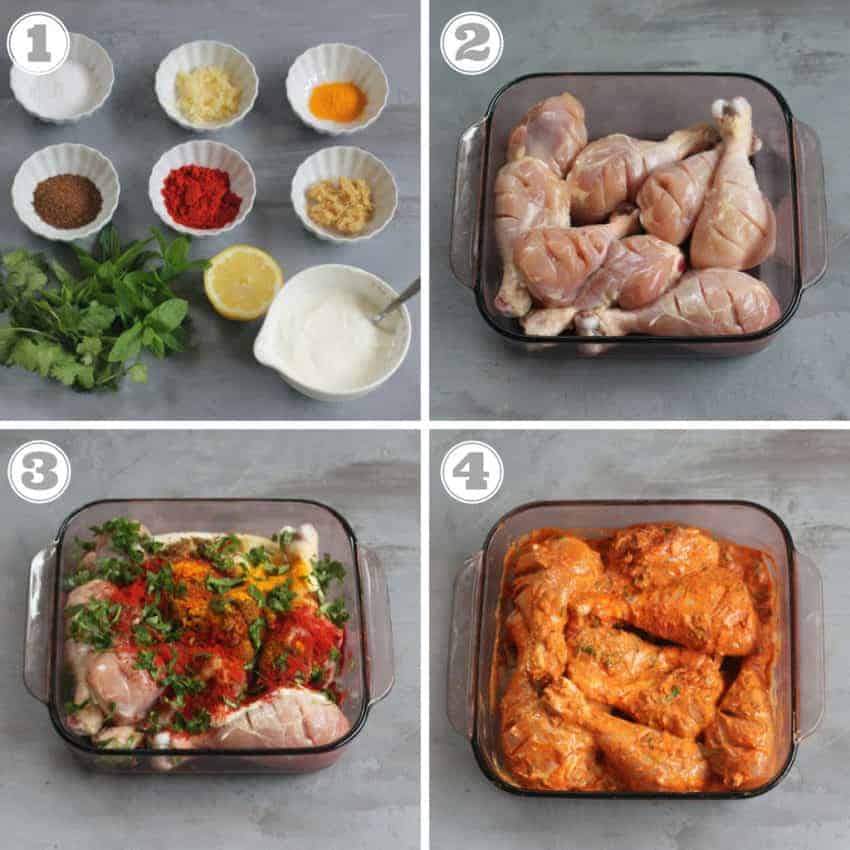
1: Marinate the Chicken - Coat the chicken with ground spices, mint, cilantro, lemon juice, yogurt, and salt. For extra flavor and easy meal prep, you can marinate it ahead of time and refrigerate for up to 12 hours (photos 1-4).
2: Soak the Rice - Soak the rice for 20 minutes to ensure it cooks up light, fluffy, and with long, separate grains. I recommend using extra-long grain basmati rice for the best results-Kohinoor and Royal are two of my go-to brands, easily found at most Indian grocery stores (photos 5-6).

3: Caramelize the onions and deglaze - As the rice soaks, start to caramelize the onions. Caramelizing in the Instant Pot may cause the bottom of the pot to get scorched. Remember to deglaze the pot well with the liquids from the marinated chicken. Pressing cancel during deglazing also prevents further overheating (photos 7 - 10).
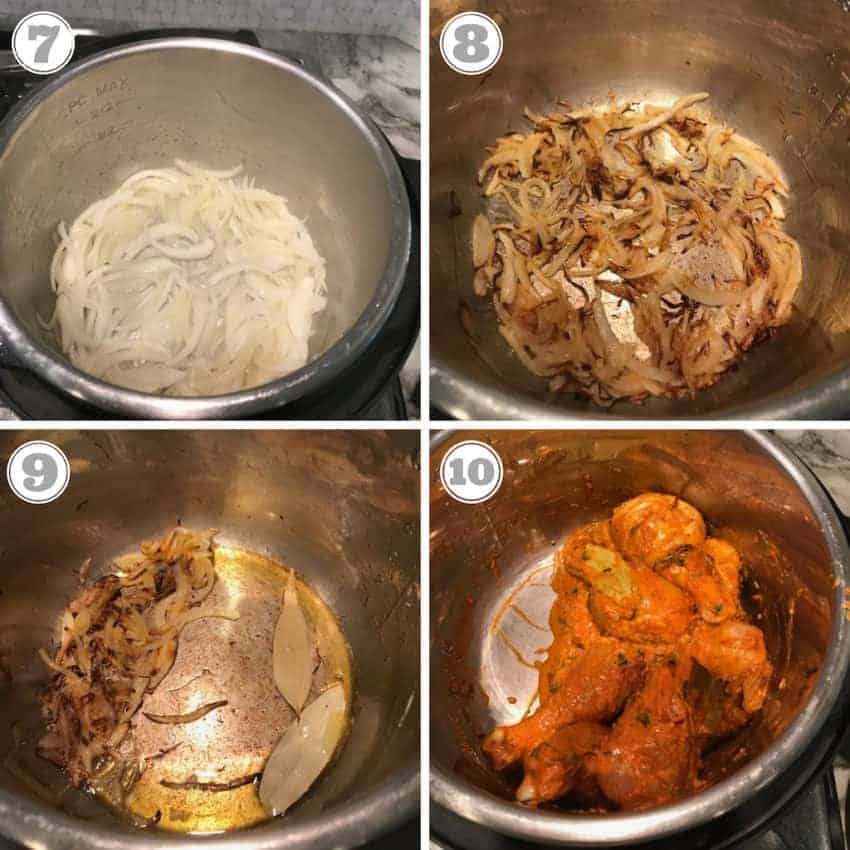
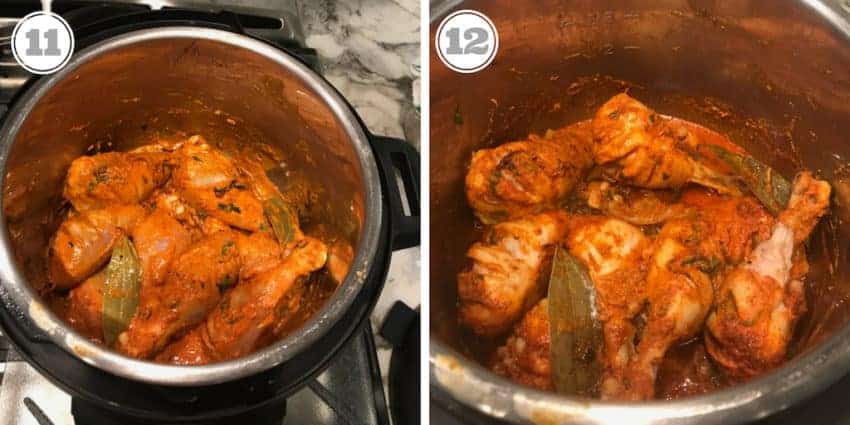
4: Partially Cook the Chicken - Bone-in chicken legs or drumsticks need a longer time to pressure cook than basmati rice. To achieve this, we first pressure-cook the chicken for 4 minutes. For boneless thighs, just sautéing for 2 to 3 minutes cooks the chicken partially, and then they can further cook along with the layered rice (photos 11 - 12).
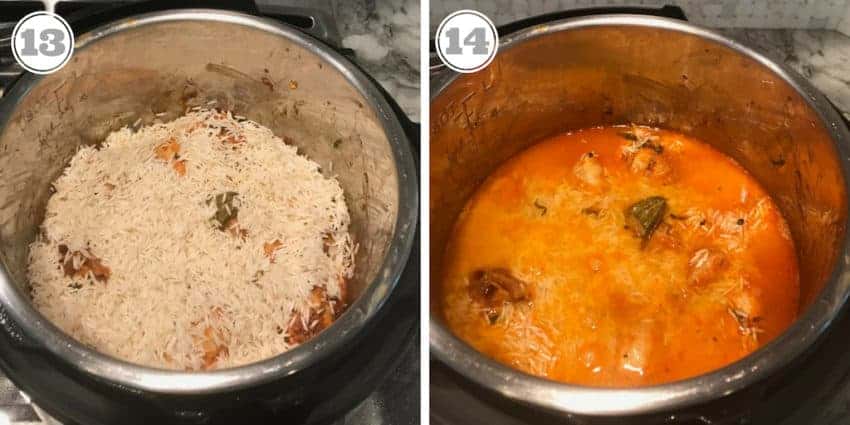
5: Layer over Rice and Pressure Cook- Drain the rice and layer it over the partially cooked chicken. Add water and make sure all the rice is under the liquids (photos 13 - 14).
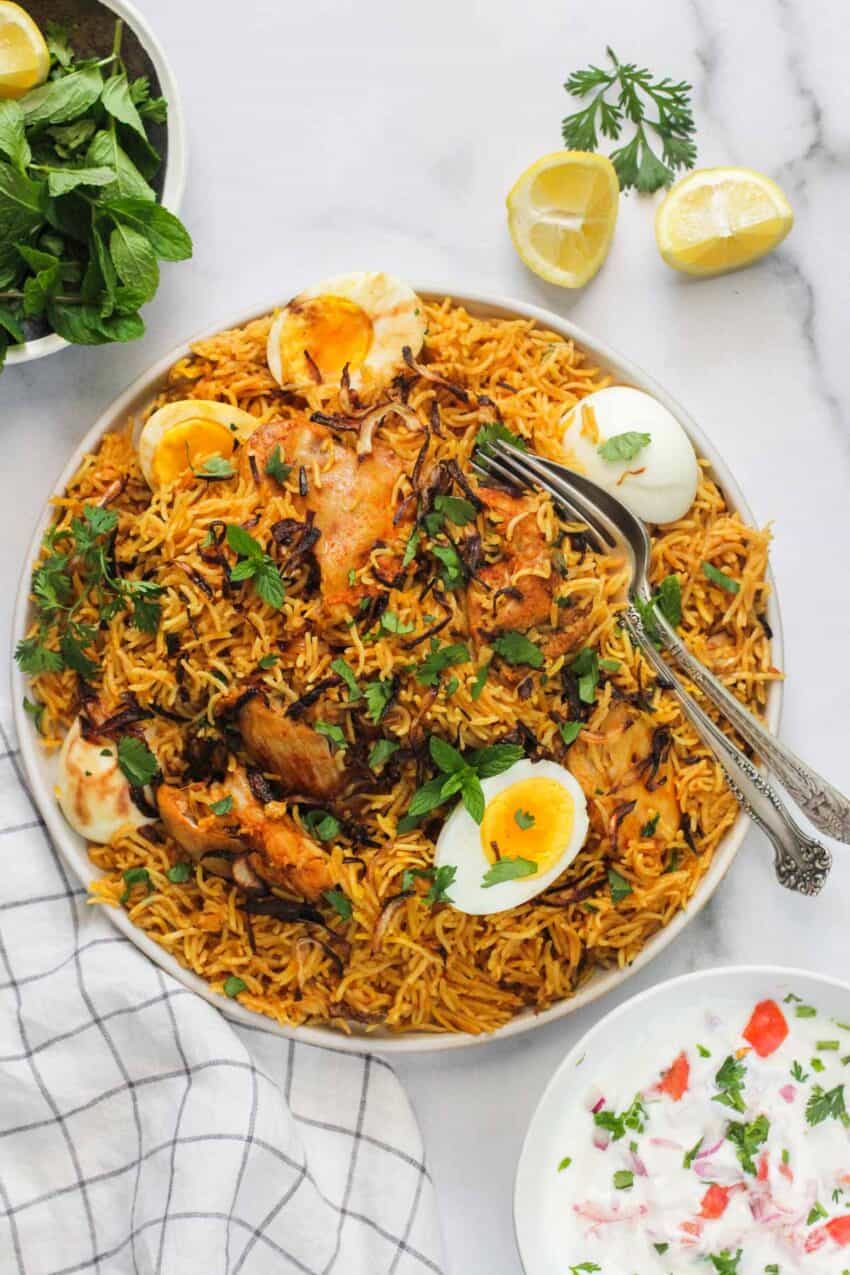
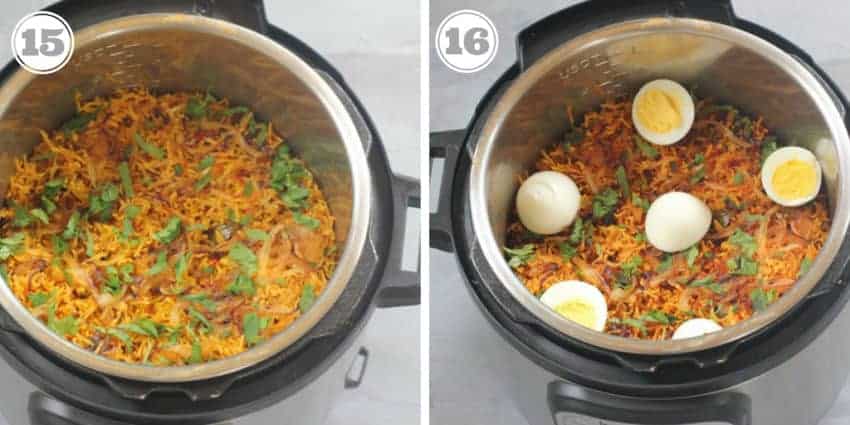
Once the Instant Pot has finished, open the lid and garnish the biryani with caramelized onions, saffron milk, fresh cilantro, and mint. Add the hard-boiled eggs on top (see photos 15-16). Let the rice cool slightly, then gently fluff it with a fork or silicone spatula. Serve with a side of raita and a squeeze of fresh lime!
Tips for making Biryani in the Instant Pot
- Marinate the Chicken Well: Pat dry the chicken to avoid excess moisture, then marinate for at least 20 minutes using plain full-fat yogurt. Use fresh garam masala for the best flavor-homemade is ideal.
- Caramelize and Deglaze Properly: If you're sautéing onions in the Instant Pot, be sure to deglaze the pot thoroughly after caramelizing. Turn off the pot and add 1 to 2 tablespoons of water to loosen any browned bits-there should be no residue left at the bottom. This prevents the dreaded "BURN" message and helps the pot come to pressure. Also, make sure the sealing ring is secured properly before pressure cooking. To avoid issues altogether, you can caramelize the onions on the stovetop in a non-stick pan. It's faster and helps keep the Instant Pot insert clean and scorch-free.
- Layer and Cook Thoughtfully: Make sure all of the rice is fully submerged in liquid before closing the Instant Pot. After cooking, the top layer of rice may appear slightly undercooked; fluff it gently and mix using a silicone spatula.
- Scaling the Recipe - You can safely halve the recipe without changing the pressure cook time. To double it, use an 8-QT Instant Pot-doubling in a 6-QT is not recommended. Cooking time stays the same either way.
★ Tried this recipe? I'd love to hear how it turned out! Leave a comment and let me know, or snap a quick pic and upload it-I love seeing your creations. If you're on Instagram, tag @ministry_of_curry so I can check it out. Your feedback means so much to me and makes all the time I spend perfecting each recipe totally worth it. Thank you!
Recipe

Instant Pot Chicken Biryani (Better Than Restaurant!)
Equipment
Recipe Video
Ingredients
Marinade
- 2 teaspoons garam masala Add 3 teaspoon for spicier Biryani
- 1 tablespoon ginger paste
- 1 tablespoon garlic paste
- 1 tablespoon kashmiri red chili powder
- ½ teaspoon ground turmeric
- ¼ cup mint leaves
- ¼ cup cilantro chopped
- 2 tablespoons lemon juice
- ¾ cup plain yogurt
- 2 teaspoons kosher salt
- 2 pounds whole bone in chicken skinless cut into 12 pieces (If using chicken thighs cut into 2 inch pieces)
Other Ingredients
- 4 tablespoons ghee divided
- 2 large yellow onions thinly sliced
- 2 bay leaves
- 3 cups extra long grain Basmati rice
- 2 teaspoon kosher salt
- 3 cups water
- 1 teaspoon saffron mixed in 1 tablespoon warm milk
- 6 eggs hard boiled and shelled, optional
- 1 jalapeno sliced into 8 wedges optional for extra spicy **
Raita
- 2 cups plain yogurt
- 1 medium yellow onion finely diced
- 2 tomatoes diced
- ½ teaspoon kosher salt
- 1 tablespoon cilantro chopped
Instructions
- Make the marinade by mixing garam masala, ginger, garlic, red chili powder, turmeric, mint leaves, half of the chopped cilantro, lemon juice, yogurt, and salt. Add chicken and coat evenly with the marinade. Keep in the refrigerator for at least 30 minutes.
- While the chicken is marinating, wash and soak the basmati rice in water. Keep aside for 20 minutes.
- Turn the Instant Pot to Saute(Hi). After the 'hot' sign displays, add half of the ghee and add thinly sliced onions. Cook stirring frequently for 10 minutes or until the onions are golden brown and caramelized. Take out half of the onion and keep aside for garnishing the biryani. Note: You can also air fry the onions
- Add the remaining ghee to the Instant Pot with half of the caramelized onions already in the pot. For extra spicy Biryani add sliced jalapeno. Add bay leaves and half of the marinated chicken and the liquid from the marinade. Press Cancel. Mix well, deglazing the pot with a spatula to take out all the browning of the pot from sautéing the onions. This is an important step that will prevent the possible "BURN" signal during pressure cooking. Once all the browning on the pot is completely removed, stir in the remaining chicken.
- a) For Chicken on bone - Close the Instant Pot and turn the pressure valve to sealing. Select Manual/Pressure Cook(Hi) and adjust the time to 4 minutes. Follow with Quick release. Mix the chicken well, once again scraping the bottom of the pot removing any food stuck to the bottom.
- or
- b) For boneless Chicken thighs - Cook on Saute mode for 2 to 3 minutes. Scrape the bottom of the pot to make sure there is no food sticking to the bottom.
- Drain the rice and gently pour it over the chicken. Add salt from the other ingredients list. Add water and gently push all the rice under the liquids. Do not stir. Close the Instant Pot and turn the pressure valve to sealing. Select Manual/Pressure Cook(Hi) mode and adjust the time to 6 minutes. Follow with Quick release.
- Open the Instant Pot. If the top layer of the rice looks uncooked, simply fluff the top layer of the rice. Then mix the rice with the chicken on the bottom of the pan. Using a silicone spatula to gently mix will also prevent the rice grains from breaking.
- Garnish with the remaining caramelized onions, saffron mixed with milk and cilantro. Serve with Raita, hard-boiled egg, and lemon wedges.
Raita
- To make the raita, whisk the yogurt in a medium bowl. Add onions, tomatoes, salt, and mix well. Garnish with cilantro.
Notes
- Deglaze the pot using some of the marinated chicken to remove any browned bits from the sautéing of the onions. This will help the Instant Pot come to pressure and also prevent the "BURN" signal.
- Deglaze the pot, once again just before adding the rice.
- Make sure all of the rice is under the liquids before closing the Instant Pot.
- It is normal for the top layer of the rice to look a bit undercooked. Simply fluff the top layer and then gently mix the biryani with a silicone spatula.
- ** This recipe makes medium spicy Biryani. For extra spicy add jalapeno. OR add another teaspoon of garam masala to the chicken.
- Tip - Although Sauté (more) function on the Instant Pot works great for true one-pot cooking, you can also caramelize the onions, stovetop in a non-stick pan. This will speed up the process and also will prevent the stainless steel insert from getting scorched which may lead to a "BURN" notice on the newer Instant Pots.
- Using small bone-in chicken pieces or boneless thighs - Skip the initial 4 minutes of pressure cooking and instead saute the marinated chicken for 2 to 3 minutes. Then layer the soaked and drained rice and pressure cook for 6 minutes
Nutrition
♥ We LOVE to hear from you! Did you try this recipe? Please share your food photo with hashtag #ministryofcurry on Facebook or Instagram, so we can see it and our followers can enjoy it too! Thank you and Happy Cooking ♥ Subscribe to our Youtube Channel for tasty and easy video recipes. Looking for more Instant Pot recipes? Check out our delicious Instant Pot Recipe board on Pinterest.


Lidia says
Hello, I don't have the Instant Pot but have a normal pressure pot which goes on gasfire like the one in the link
https://www.delcocoshop.com/lagostina-casa-mia-pentola-a-pressione-5-l-22-cm-acciaio-inossidabile-18-10.html
Will this recipe work on this one or in the oven. I love indian food and used to eat loads when I lived in London but here not so easy.
Thanks for your help.
Lidia
Archana says
Yes gas pressure cooker will work too! Once the Pressure cooker is fully pressurized you want to cook for about 6 mins
Melinda Rajoria says
I’m a big fan of your other recipes. However, i tried a different recipe than yours today and it called for adding the marinade with the rice and chicken before pressurizing. The biryani ended up being over powering and the rice was mushy. In this recipe, do you call for only adding the chicken or both chicken and marinade? My husband is from Delhi and he said the recipe didn’t taste like classic biryani. I really want to get it right before I make it for his family.
Archana says
Hi Melinda, Follow the tips in this recipe. If you pat dry chicken there should not be much excess marinade. I add all of teh marinade because usually I do not too much left.
Hardik Anavkar says
I started cooking in April 2020 during the lockdown and this was one of the first dishes I tried. My partner said that it is very ambitious of me to try Chicken Biryani at the very start, but you recipe is so easy to follow with pictures, it came out very good. I have made this many times since and it just comes out very consistent every time. Thanks a lot for the recipe Archana. Makes me feel close to India living in Toronto.
Sara says
Hi. This looks like a great recipe so I'm going to try this next time. A couple of questions for you. Is it important to add salt to both the chicken marinade and then also add it when adding in the rice? I worry this is too much salt but also want to ensure the taste comes out right when I make this. Secondly, do you have any tips to ensure every grain of the rice in the biryani is separated and the grains don't stick together?
Archana says
Hi Sara, Yes all the notes on rice are in the recipe. I would add salt in both marinate and rice
Renu says
Hi! If I were to use already cooked rice on this recipe, would you have any recommendations for altering the cooking times? Thanks.
Archana says
I have not tried with already cooked rice. But may be you can layer over cooked chicken and cook on stovetop covered on lowest heat for 20 mins.
Deb says
So good!!!! We omitted the eggs. We will definitely make again!
Rupali Pai says
Do you have a non instant pot method for this recipe?
Archana says
I don't but plan to add one soon
Roger says
Thanks for this awesome recipe! The first time I made it came out perfectly. Can you cook the biryani on medium or low pressure, maybe a little longer, to avoid the “burn” situation? Second time I tried, as you suggested with taking precaution to deglaze the pot, but I still ended with the “burn” indication twice. If it can be done on medium/lower pressure, would that help? And how do I adjust time at those settings?
Archana says
I don't think low pressure will help! After deglazing the pot add another 2 to 2 tablespoons of water to the bottom of the pot and then layer over all the ingredients. Also make sure to not mix in the rice.
Kenji Fujishima says
I tried this recipe tonight, and...is 6 minutes actually enough to cook the rice in the Instant Pot? Because the rice came out severely undercooked. Fwiw, I was cooking it in a 3-quart DUO rather than a 6-quart.
Archana says
Soaked Basmati rice can cook in as less as 4 mins. Did you use organic rice?
Sam says
Amazing recipe. What would the cook times change to if I switched the meat to goat?
S.K. says
I never thought I could make chicken biryani myself, let alone in an instant pot! Though it may seem like a lot of steps, you really do make it easy to follow. My husband LOVED this dish and said to make it for our neighbors. That’s when I know it’s really good- when I feel confident about how it turned out to share with others outside my family. Thank you for yet another delicious meal. Your recipes have been my saving grace in this crazy year!
Sally Lake says
Hi, am going to try this but am slightly concerned about the quick release instruction. I have heard that this can cause meat to dry out but am assuming that in this recipe the rice covering the chicken shields it and stops that from happening. Would it make a lot of difference if I erred on the side of caution and natural released for 10 minutes before quick-releasing? Or should I just be brave, trust you and quick release?
Archana says
If you are using chicken drumsticks or thighs you can quick release. If you are using Chicken breasts you can do natural pressure release
Steve says
Hello,
Did try the recipe yesterday and it comes out perfect flavour ! It was a bit burned below in the instant pot.
Small question : I used the measuring cup coming with my old rice cooker with a capacity of 180 ml. Is it the same as you used ? If not could you advice on the metric capacity ?
Regards
Steve
Archana says
I use the 240ml cup but as long as you use the same cup to measure rice and water you should be good with this recipe. As far as the burn, make sure to deglaze the pot and do not mix in after adding the rice.
Ani says
Delicious biryani everytime. This is a staple dish in our household. We used to purchase biryani from restaurants ... not anymore. Have made this recipe many times and it's tasty everytime and easy to make.
Sona says
Hi,
I am planning on trying this recipe. I want to skip the yogurt and ghee as my daughter has dairy allergy. What can I use as substitute?
Sona
Archana says
You can use any neutral oil instead of ghee. Also use 1 to 2 tablespoons of lemon juice instead of yogurt to marinate the chicken
Chrstine says
Hi - can you make this in the small DUO instant pot?
Archana says
I would reduce the rice to 2 cups for 3 qt
Janani says
I have tried this recipe a few times and loved it. It’s a fail proof recipe. Came across this one when I was on the hunt for an instant pot version of chicken biryani. Keep up the great work.
Jo says
Tried this tonight- came out really well! Thank you for the detailed instructions!
NS says
Oops - got bone-in chicken thighs (instead of legs) - would the timings be the same as the bone-in legs?
Archana says
yes! Same time. Remove the skin first
Julia says
I love this recipe! I’ll be halving the recipe this time around and using boneless, skinless chicken thighs. Is the cooking time in step 8 still the same (6 minutes)?
Archana says
Same time! Instant Pot will come to pressure much faster. And since you love this recipe I will love a 5 star rating from you instead of 4 star 🙂
Divya says
Bought my first Instant pot over the holiday break and this was the first recipe I tried. Loved the detailed instructions and was amazed by the simplicity and hassle-free method of making biryani. Next time round, I will sauté onions in a skillet as I think it would be faster . Thanks for the great recipe
David Perlmutter says
Phenomenal recipe! Makes enough for like 6-8 servings at least. I'm not sure the saffron is necessary, it kind of gets drowned out with the rest of the dish's excellent flavors. Caramelizing the onions in the instant pot took much longer than 10 minutes also, maybe they would caramelize faster in a cast-iron skillet? I may also try frying the onions next time for an added crunchy texture.
Archana says
Agree they do caramelize faster in a stove top skillet!
Subhasish says
The recipe delivers a result very close to authentic and aromatic traditional biryani. I have followed the recipe with a few minor variations ( added nutmeg) and also used it for a vegetable version with incredible results. I have tried ir more than once- so it is repeatable and predictable. My family loves it and have praised your recipe to many family and friends! For me, it is one less reason to eat outside and on demand :). The directions are helpfully tailored for instapot to avoid burn and over cooking. Well done and Thanks!