

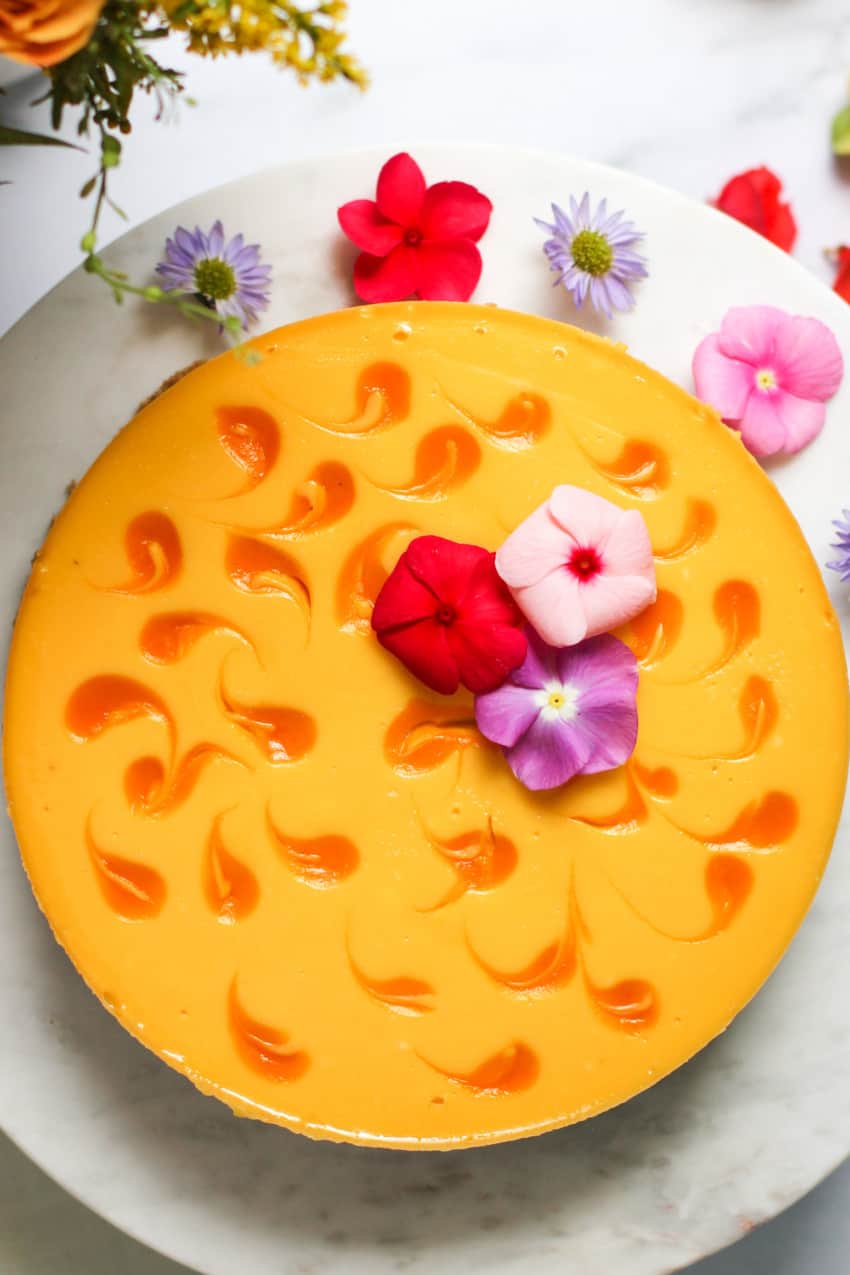
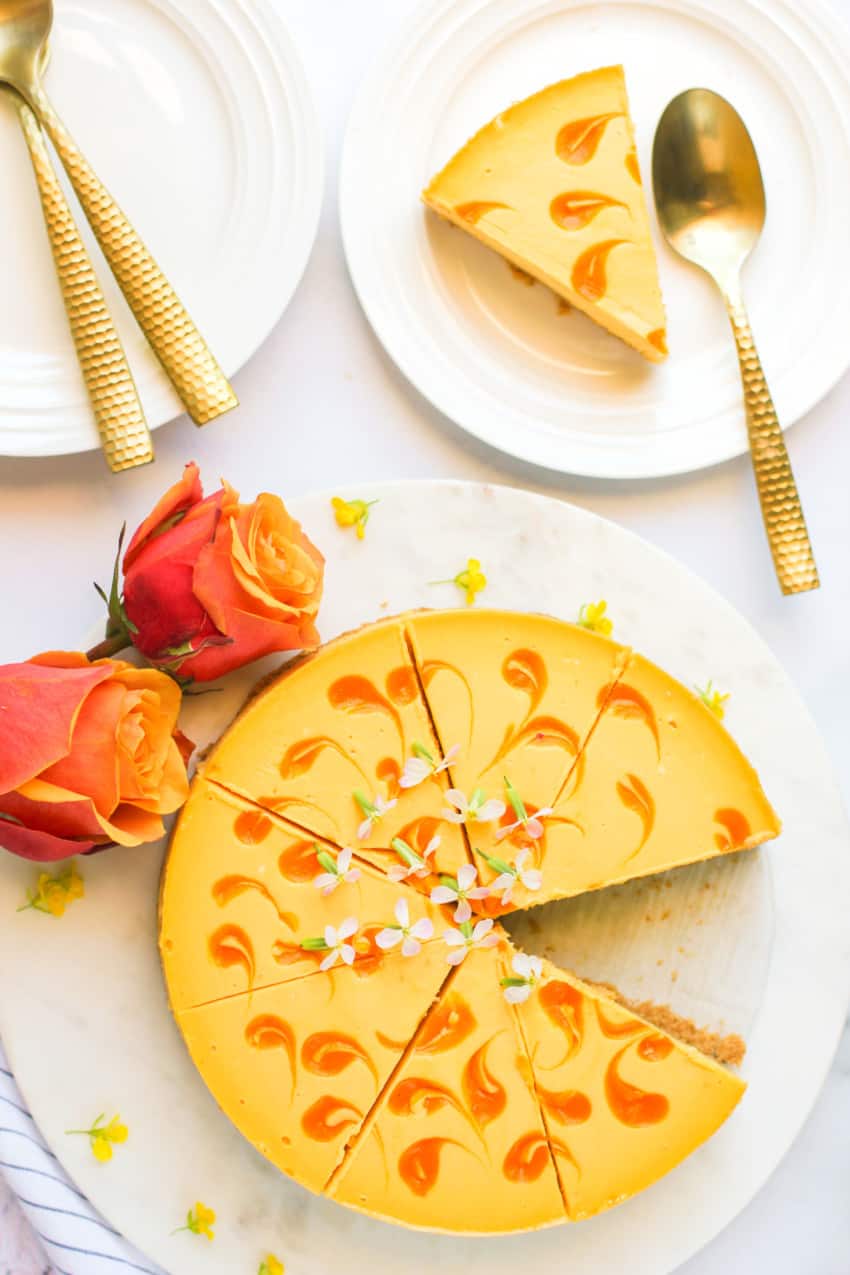
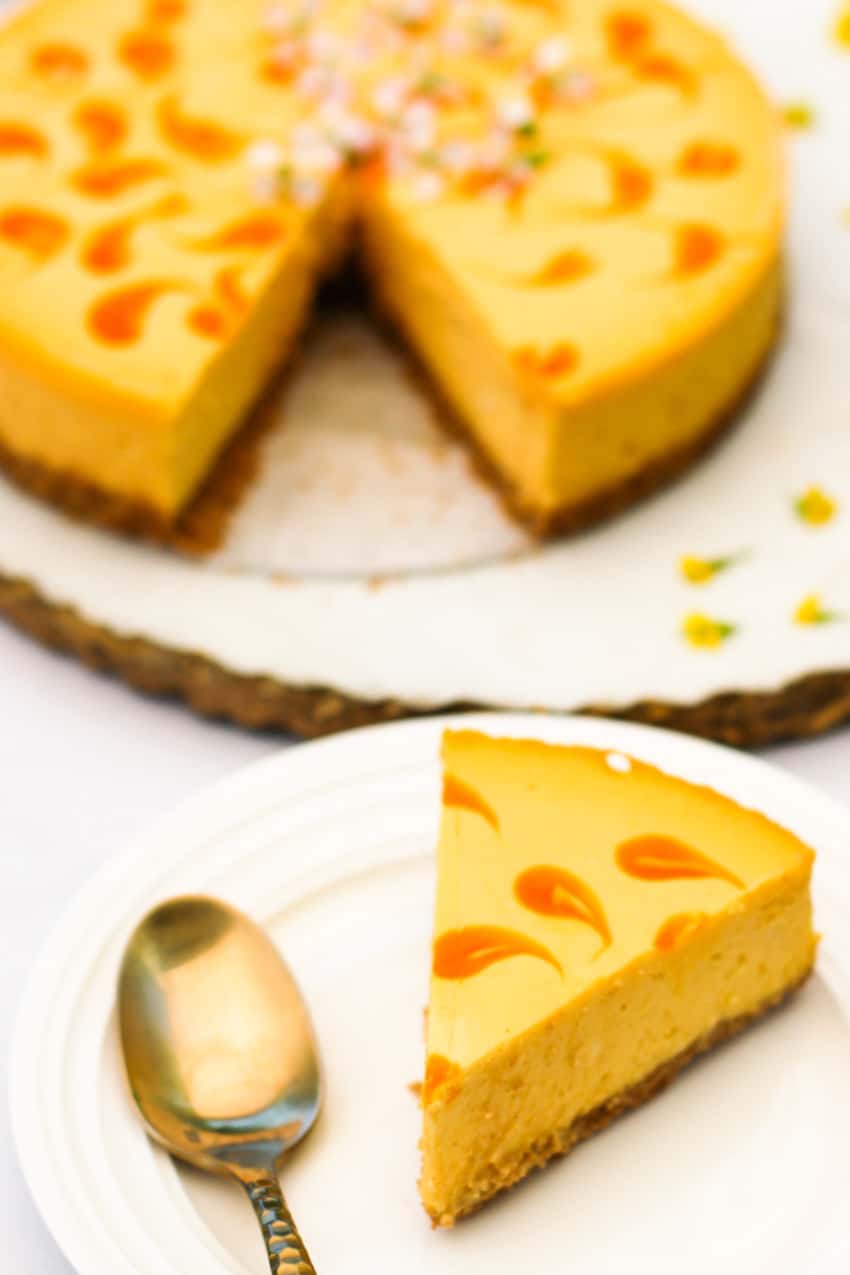
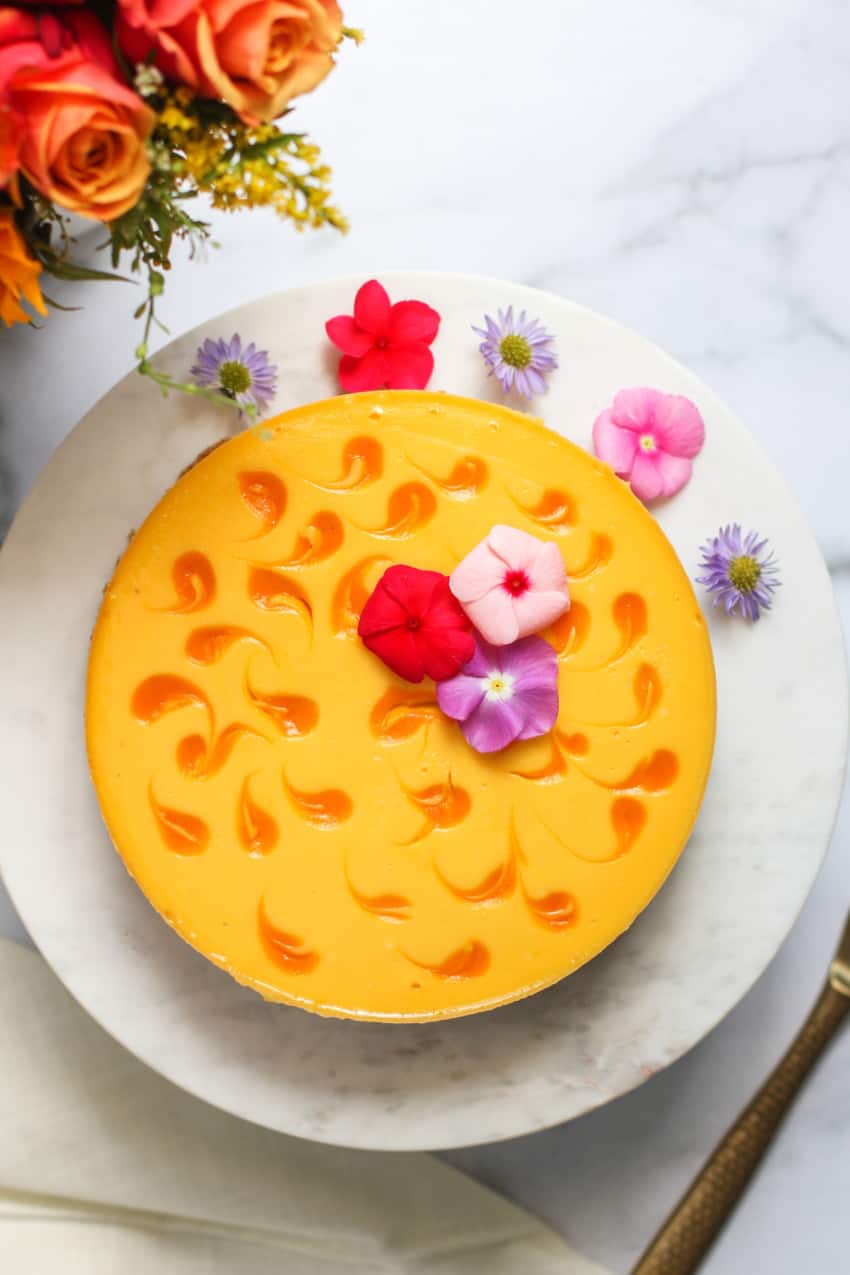
Heavenly Mango Cheesecake! The smooth textures and flavors of this divine creamy tangy mango cheesecake are elevated with a perfectly crumbly crust for a decadent treat. Best of all, this radiant golden cheesecake is easy to make using the Instant Pot Pressure Cooker.
Want to Save This Recipe?
Enter your email & I'll send it to your inbox. Plus, get great new recipes from me every week!
By submitting this form, you consent to receive emails from Minstry of Curry
Jump to:
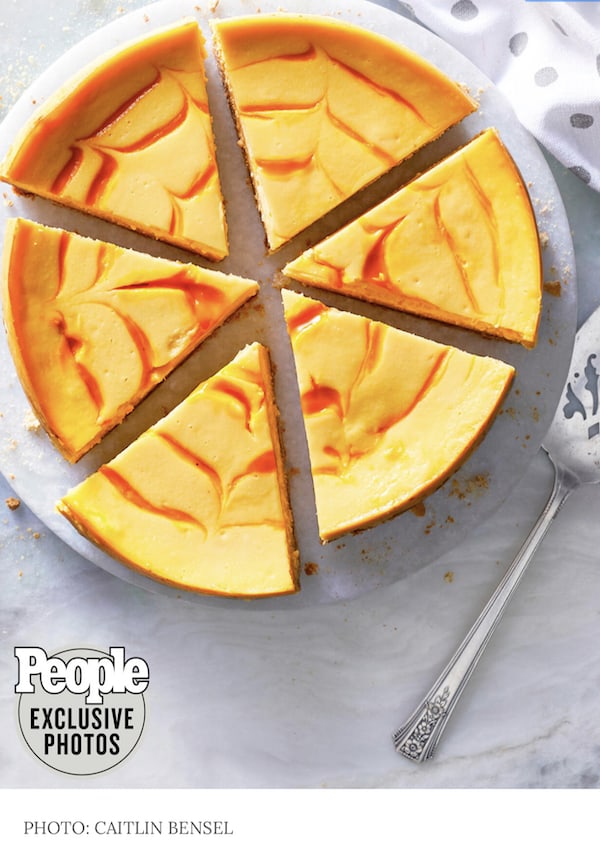
People Magazine Feature
I am so excited to share my signature recipe from The Essential Indian Instant Pot Cookbook which was published in People Magazine!
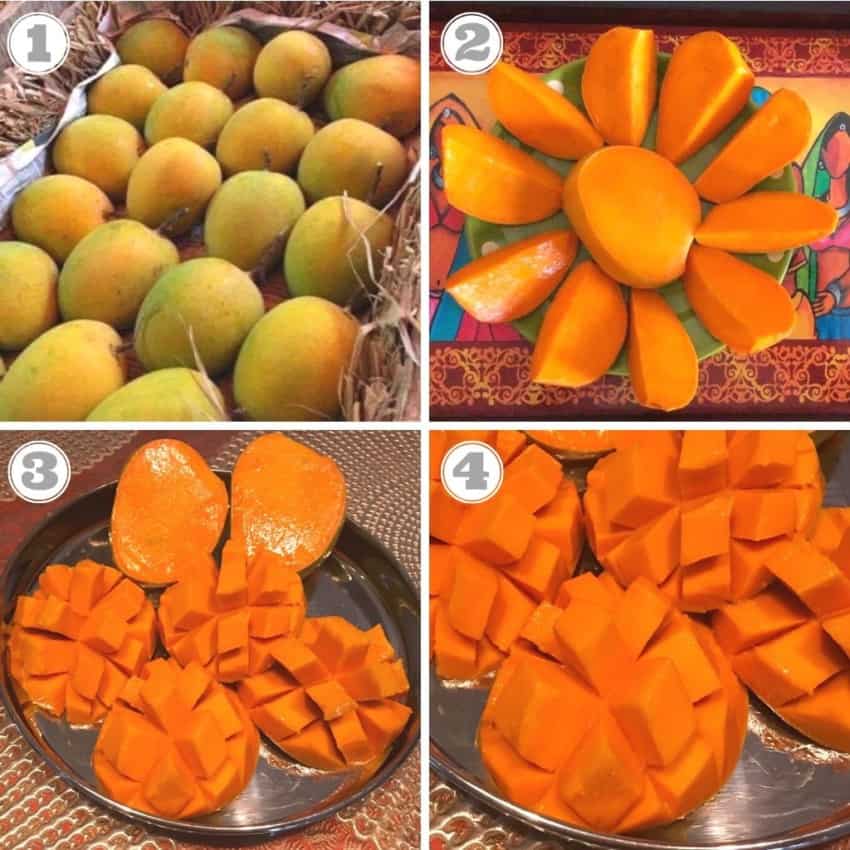
The shortest but most anticipated season in India is definitely mango season. Although there are many varieties of mangoes, Alphonso mangoes are treated like royalty. They have notes of pineapple, peach, orange, and even a little bit of honey and can be served in many different ways.
Since Alphonso Mangoes are seasonal and hard to find here in the US, I make sure to have my pantry stocked with canned Alphonso mango pulp that is easily available in Indian grocery stores and has a longer shelf life.
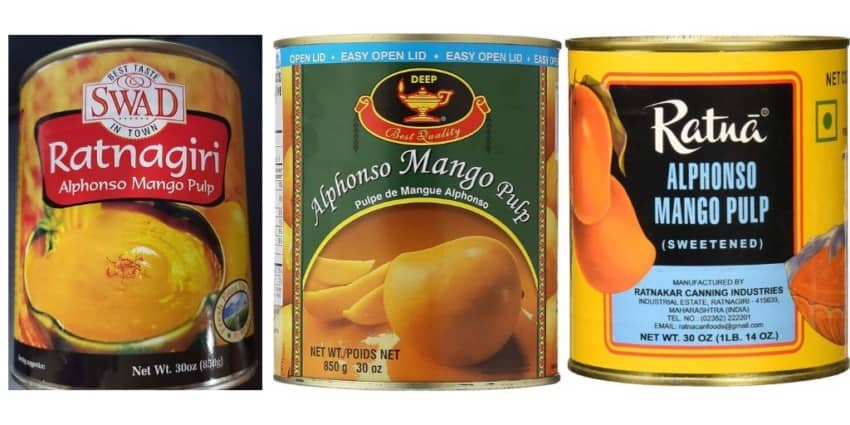
Canned Alphonso mango pulp is a convenient way to add authentic Alphonso mango flavors and aromas to lassi, yogurt, Mango Tiramisu or cheesecake. It can also be consumed right out of the can as a side dish for dipping with a hot paratha.
You probably have already heard why cheesecakes made in the Instant Pot are the best. Here are just a few reasons why I love to make cheesecake in the Instant Pot:
- Consistent cook time
- Lighter texture with delicate flavors
- No need for a water bath
- Actual cook time is shorter than the oven
- No need to pre-bake the crust
How to Make Mango Cheesecake
Here is how to make Instant Pot cheesecake in 4 easy steps. I am showing the detailed process photos so you can see the textures at every step. For the full printable recipe scroll down to the recipe card.
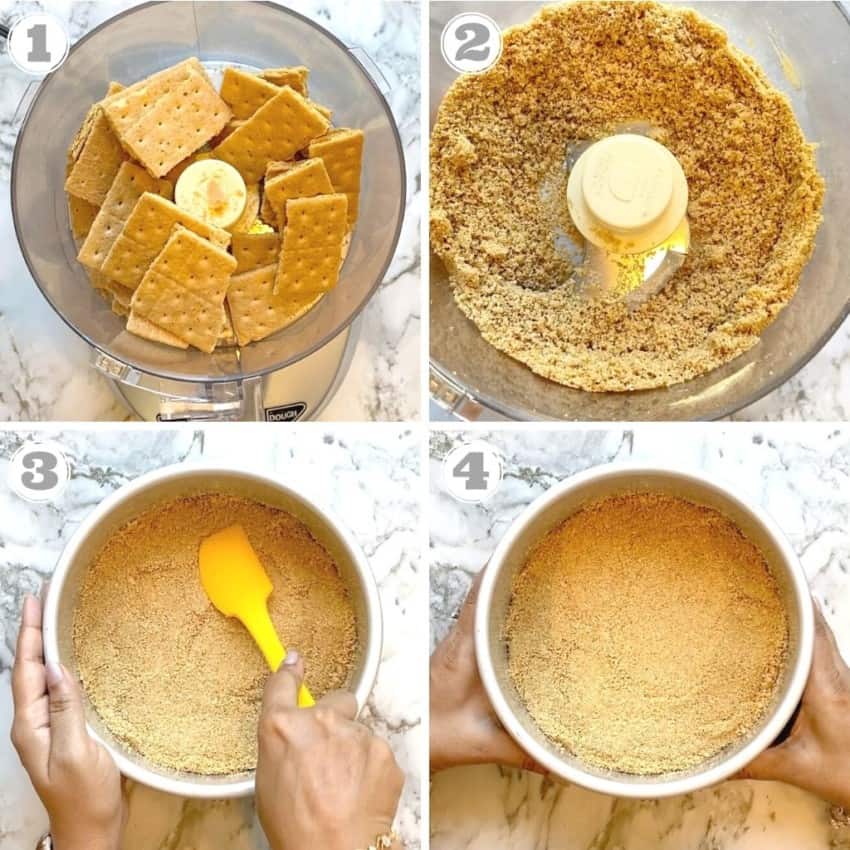
Step 1: Preparing the Crust
Here is how you make the crust using graham crackers
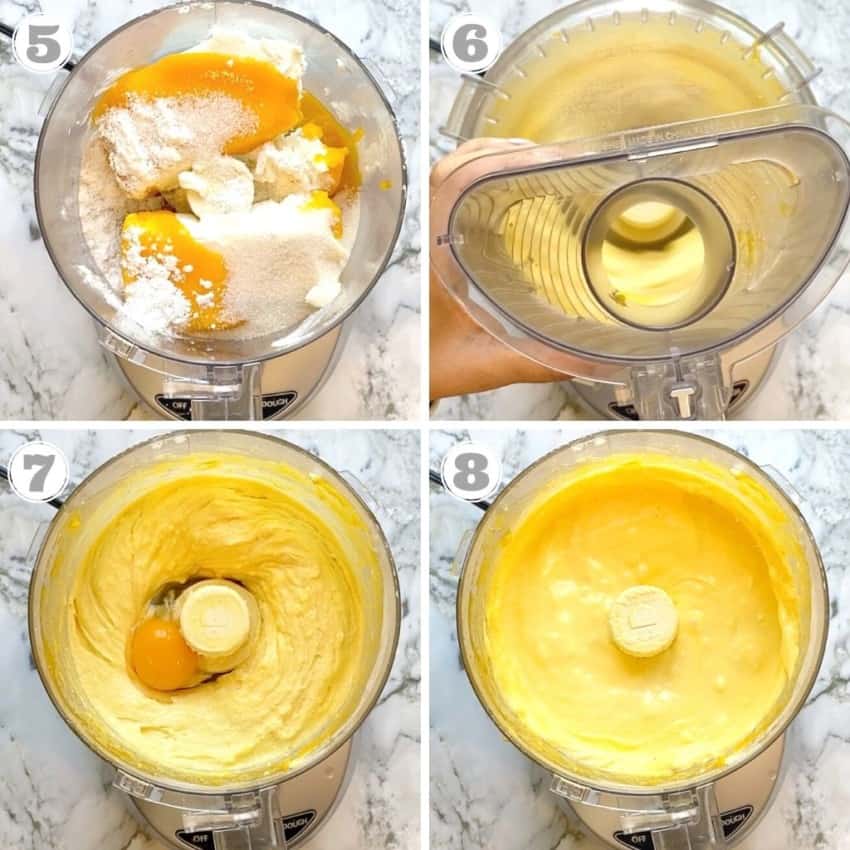
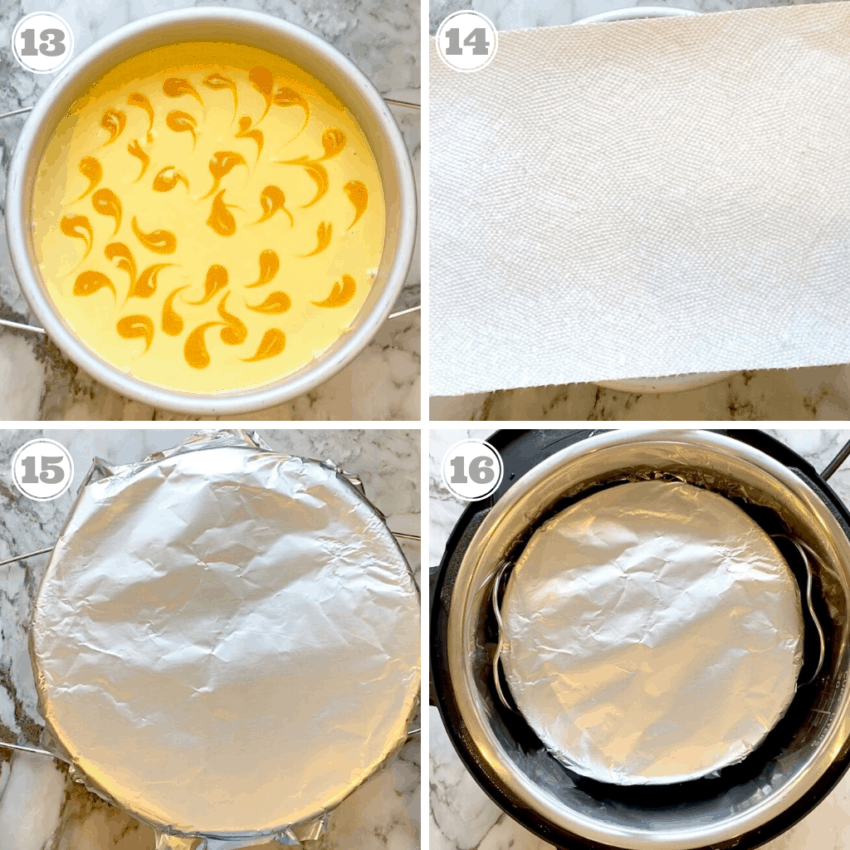
Step 2: Making the Batter
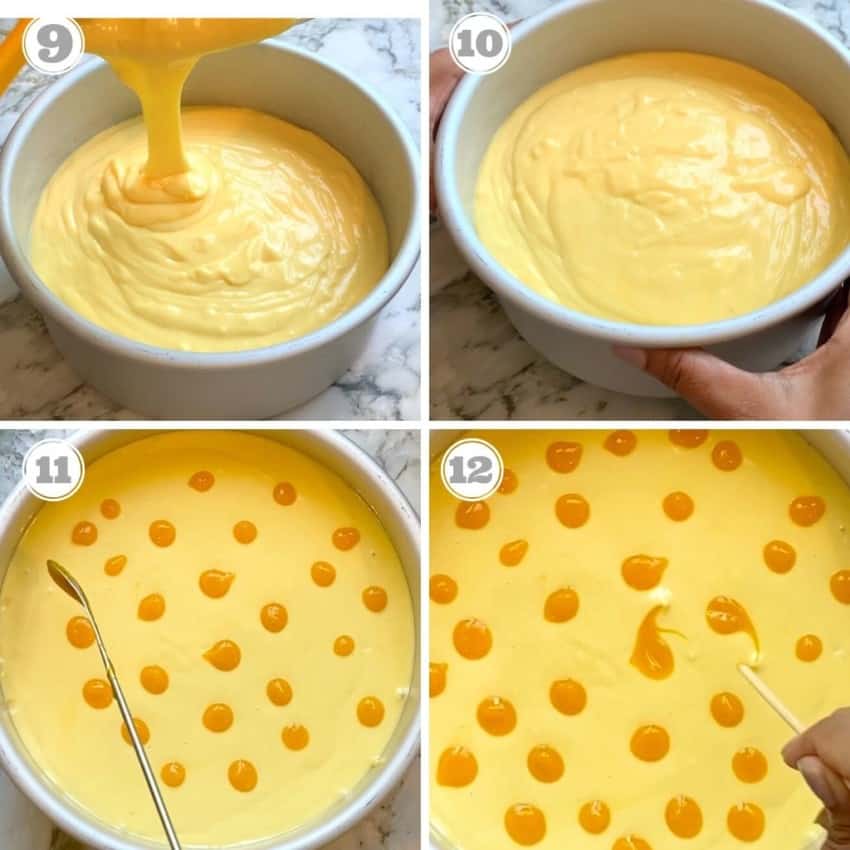
Remember not to ever process and have fun making those swirls!
Step 3: Pressure Cooking
Covering with paper towel and aluminum foil helps any moisture getting in the cake
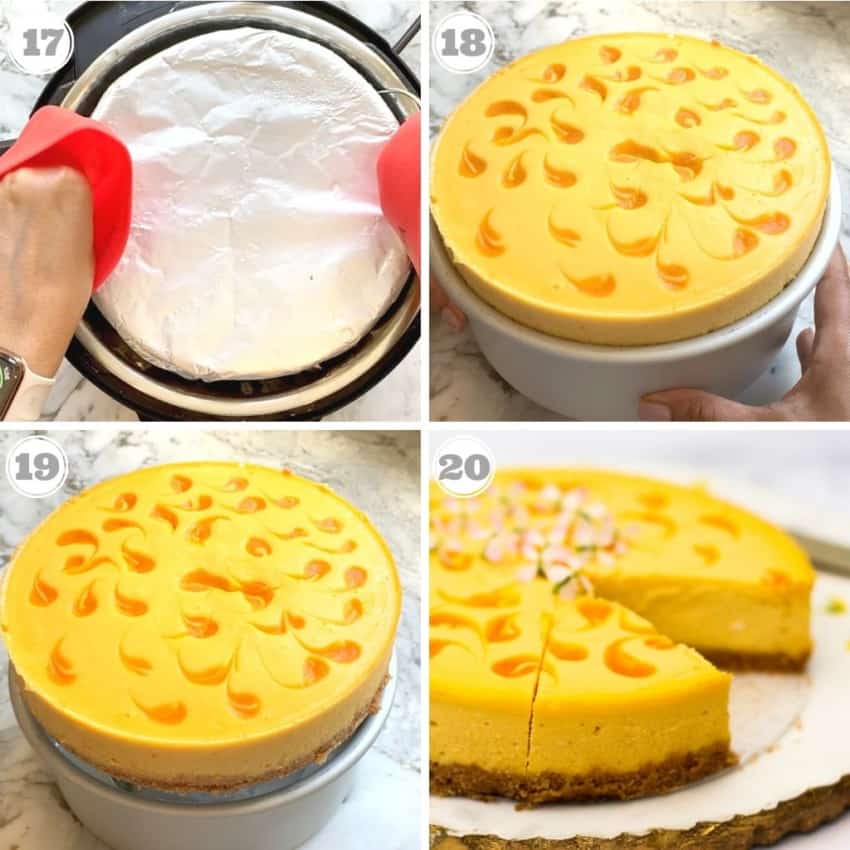
Step 4: Cooling and Chilling
Hardest part, but as it cools it finishes cooking and the chilling adds an even firm texture!
Tips
- Make sure cream cheese and eggs are at room temperature
- Use a back of a spoon or a measuring cup to firmly press down the crust
- I use a food processor to make the cheesecake batter but you can also use a hand mixer on low speed
- It is really important to add the eggs and yolk, one at a time, and pulse one or two times after each addition until just combined. Be careful not to overmix. Over mixing the batter can cause the cheesecake to overrise, spill, or get puffy textures.
- After pouring the batter into the cake pan, tap the pan gently on the countertop. This helps any air bubbles in the batter rise to the surface. Most of the air bubbles will burst as you tap the pan but if not, burst them with a toothpick. This helps to get a smoother surface
- Use a wooden skewer to make the swirls on the cheesecake and do them gently on the surface as poking in too much can cause cracks
- Cover the cake pan with a paper towel and aluminum foil. This will prevent any excess moisture from getting into the cake while pressure cooking and while taking the cake out.
Substitutions
- You can substitute Alphonso mango pulp with homemade mango pulp. Use sweet and ripe mango variety like Atulfo, Haden, or Kent to make smooth homemade pulp in a blender
- I have had the best and most consistent results with full-fat Philadelphia cream cheese available in most US grocery stores. Please remember to use the full-fat cream cheese in this recipe
- I have made this recipe without eggs. For an eggless mango cheesecake, skip the 2 teaspoons of flour called in the recipe. Substitute eggs with 2 tablespoons of cornstarch mixed in 2 tablespoons of water and ⅓ cup sour cream. Follow the remaining recipe as is, making sure not to over mix the batter.
How to bake Mango cheesecake in the oven?
Don't have an Instant Pot? I got you covered! Cheesecakes are baked in the oven in a water bath, where the cake pan is kept on a baking tray with water. Here is how:
- Make sure to wrap the bottom of the cake pan with 2 layers of aluminum foil to prevent the water from going inside the cake pan, when you use a push pan or springform pan
- Preheat oven to 300 deg F.
- Prepare the cake pan as directed in the recipe card below and you do not need to cover the top with a paper towel and foil.
- Place the prepared cake pan with the batter in the center of a baking tray. Keep the baking tray on the middle rack in the oven and pour 1 cup of hot water into the baking tray.
- Bake for 45 min to an hour or until most of the cake is set except the center 1 inches is a bit wiggly. The cake will continue to cook and fully set during the cooling cycle. Since all ovens are different, make sure to check on the cake after the initial 40 mins to prevent overcooking.
- Take the cake out and then allow it to cool at room temp for an hour and then allow to chill in the refrigerator for 6 hours.
Did you enjoy this pretty cheesecake? Here are some more desserts that never fail to impress:
- Ricotta Cheesecake - A lighter Instant Pot cheesecake with a rich luxurious texture from ricotta cheese and a buttery pistachio crust
- EASY Raspberry Trifle - Delightfully airy cake, fresh berries, cardamom & saffron pudding layered with pistachios and cream, a no-cook recipe
- Rose Falooda - An ice cream float with aromatic rose syrup, cool basil seeds, and thin noodles over chilled milk
- Cinnamon Sugar Puff Pastry Twists - Easy 3-ingredient homemade Khari biscuits that are delicious to eat and a treat to the eyes
- Summer Berry Cake - Delicious cake made with mixed berries and lemon zest that is topped with lemon glaze and fresh berries
- Berry Bread Pudding - A lush and creamy bread pudding made with berries tucked in the layers of rich brioche bread and milk custard
Recipe

Mango Cheesecake
Recipe Video
Ingredients
CRUST
- 7 sheets graham crackers crushed
- 2 tablespoons unsalted butter melted
FILLING
- 1 pound philadelphia cream cheese at room temperature
- ½ cup mango pulp plus 2 teaspoons
- ½ cup sugar
- 2 teaspoons all-purpose flour
- 2 large eggs plus 1 egg yolk at room temperature
Instructions
- Pour 1 cup water into the InstantPot and place the wire metal steam rack in the pot.
- Line the bottom of a 7-inch cake pan with a removable bottom with parchment paper. Coat the sides of the pan and the parchment paper with cooking spray.
- To prepare the crust: In a food processor, pulse the graham crackers a few times, until small crumbs form. Add the melted butter and pulse until just combined. Pour the graham cracker mixture into the prepared pan and evenly press onto the bottom. Freeze the crust for 20 minutes while you prepare the filling.
- To prepare the filling: Wipe the food processor bowl and blade clean with a paper towel to remove any crumbs. Add the cream cheese, the ½ cup mango pulp, the sugar, and flour and pulse until smooth, a few seconds; do not overmix. Add the eggs and yolk, one at a time, and pulse one or two times after each addition until just combined. Again, be careful not to overmix. Gently stir the filling with a rubber spatula until well combined.
- Pour the filling into the frozen crust. Tap the pan gently on the countertop so that any air bubbles in the batter rise to the surface. Most of the air bubbles will burst as you tap the pan but if not, burst them with a tooth pick. This helps getting a smoother surface.
- Drizzle with the remaining 1 ½ teaspoons mango pulp and gently swirl through the batter with a wooden skewer; be sure to burst any air bubbles. Cover the top of the pan with a paper towel and place an 8-inch sheet of aluminum foil over the top, crimping down the foil around the sides of the pan to secure the paper towel in place. Place the pan on the rack in the Instant Pot.
- Secure the lid and set the Pressure Release to Sealing. Select the Pressure Cook or Manual setting and set the cooking time for 37 minutes at high pressure.
- Let the pressure release naturally; this will take 10 to 15 minutes. Open the pot and, wearing heat-resistant mitts, lift out the cake pan. Remove the foil and paper towel, then dab off any liquid that may have accumulated on top of the cheesecake with another paper towel. Do not worry if a 1-inch circle in the middle of the cake is a bit jiggly; the cake will continue to cook as it cools.
- Let the cheesecake cool on the counter for about 1 hour.
- To remove the cheesecake from the pan, carefully run a butter knife around the inside edge of the pan and down the sides. If your pan is a push pan type, place it on an empty glass cup and gently push down on the top edges of the pan. This will help the cake to release from the pan sides. If using a springform pan, unclasp the collar on the pan and lift it off. Transfer the cheesecake to a platter. Refrigerate for at least 6 hours and up to 5 days.
- Cut into wedges and serve cold.
Notes
- Make sure cream cheese and eggs are at room temperature
- Use a back of a spoon or a measuring cup to firmly press down the crust
- I use a food processor to make the cheesecake batter but you can also use a hand mixer on low speed
- It is really important to add the eggs and yolk, one at a time, and pulse one or two times after each addition until just combined. Be careful not to overmix. Over mixing batter can cause the cheesecake to over rise, spill, or get puffy textures.
- After pouring the batter into the cake pan, tap the pan gently on the countertop. This helps any air bubbles in the batter rise to the surface. Most of the air bubbles will burst as you tap the pan but if not, burst them with a toothpick. This helps to get a smoother surface
- Use a wooden skewer to make the swirls on the cheesecake and do them gently on the surface as poking in too much can cause cracks
- Cover the cake pan with a paper towel and aluminum foil. This will prevent any excess moisture from getting into the cake while pressure cooking and while take the cake out
- You can substitute Alphonso mango pulp with homemade mango pulp. Use sweet and ripe mango variety like Atulfo, Haden or Kent to make smooth homemade pulp in a blender
- Make sure to wrap the bottom of the cake pan with 2 layers of aluminum foil to prevent the water from going inside the cake pan, when you use a push pan or springform pan
- Preheat oven to 300 deg F.
- Prepare the cake pan as directed in the recipe card below and you do not need to cover the top with a paper towel and foil.
- Place the prepared cake pan with the batter in the center of a baking tray. Keep the baking tray on the middle rack in the oven and pour 1 cup of hot water into the baking tray.
- Bake for 45 min to an hour or until most of the cake is set except the center 1 inches is a bit wiggly. The cake will continue to cook and fully set during the cooling cycle. Since all ovens are different, make sure to check on the cake after the initial 40 mins to prevent overcooking.
- Take the cake out and then allow it to cool at room temp for an hour and then allow to chill in the refrigerator for 6 hours.
- Skip the 2 teaspoons of flour called in the recipe.
- Substitute eggs with 2 tablespoons of cornstarch mixed in 2 tablespoons of water and ⅓ cup sour cream.
- Follow the remaining recipe as is, making sure not to over mix the batter.
Nutrition
♥ Subscribe to our Youtube Channel for tasty and easy video recipes. Looking for more Instant Pot recipes? Check out our delicious Instant Pot Recipe board on Pinterest.
Swag says
Can I use fresh mango pulp? How much sugar should I add in that case and how many mangoes?
Archana says
Yes! One large mango, but you can sub 1:1 for the canned and add more sugar if your mango is not sweet.
Lynn says
Love this recipe. I was getting better at the pretty design on the top and then i decided to try a whipped topping with mango pulp in it and it was fantastic! No more pretty design - sorry. Then I also started putting chunks of mango in the batter and on the crust before the batter is poured. Even better. It’s so light and refreshing I find myself making it at least once a month. I also could not find canned mango so i googled making my own pulp and by the 3rd try it was much easier! Finally found a can so we’ll see if it makes a difference next time. I and my family thank you for sharing this and making it easy to follow - I require easy and comprehensive.
Phyllis says
Wow! Made this cheesecake this afternoon and we just had it for dessert. So creamy, so delicious! So easy! Makes me never want to bake a cheesecake again lol
Nidhi says
Can I use any other fruit? Do I need to
Make a change in the recipie if I use strawberry or blueberry
Marisol Gonzalez says
Can i make this without a crust?
Archana says
Sure! Although I have not tried, I think same cook time will work.
Sappy says
Can i use salted butter?
Archana says
Yes!
Anuradha Nerli says
Can I use blueberry instead of mangoes and make this cake as blueberry cheese cake
Archana says
Yes you can! Follow same proportions as the mango pulp.
Janaki Mandavilli says
What size pan should I use if I want to double the recipe? And how long should I bake?
Archana says
Try the regular 9 inch cake pan. I have not tried doubling this recipe. Since you are baking, you can add more time as needed
Maya says
How would I make this if I were to use a 9in instead of 7in? What would need to be changed?
Archana says
I am not sure if a 9 inch pan will fit Instant Pot
Swathi says
For many How many days will the cheese cake stay fresh?
Can we make it ahead 2-3 days ahead for a party?
Archana says
It stays fresh for a week refrigerated. You can def make it 2-3 days ahead
Eshani says
Hi!
Thank you for the recipe!
Can skip the all purpose flour? If not what can I substitute it with?
Archana says
I have not tried without all purpose flour.
Paola says
By mistake I skip the purpose flour, and the cheesecake came out perfectly!
sne3103 says
Is the half cup sugar for sweetened mango pulp? Can you tell me how much sugar to use if I am using unsweetened mango pulp?
Archana says
same for both. The canned mango pulp os not overly sweet in this recipe.
Ann says
Has anyone baked in oven? How long did it take? Did u use water bath? Or baked straight?
Thanks
Toni says
I did using the water bath at 300 F and it took over 2 hrs to bake. Not sure where I went wrong but that’s double the stated time
Archana says
Could it be the size of the cake pan? 2-hours is def much longer than what I have needed for this cake in the oven. I hope you enjoyed the taste and textures.
Sally says
When cooking in the instant Pot do you need to put water at the bottom or just a rack?
Archana says
Yes 1 cup water before placing the rack
Sravanthi Kache says
Awesome recipe!! Family loved it ❤️
Savi says
Hi, how long should I bake the cheesecake in the oven if using the 9 inch pot?
Archana says
Hey! you want to google how to cook cheesecake in water bath.
Anu says
Can you please share the mango pulp brands for the recipe?
Archana says
Swad, Ratna, or Deep Alphonso mango pulp
Jayshree says
Looks yumm. Has anyone tried the eggless version?
Archana says
The Eggless version is tried and tested! It comes out amazing!!
Nissi says
Beyond just the taste being phenomenal, this recipe was quick and easy to make! Mango is a favorite in our house and this will easily be going into the summer dessert rotation!
Archana says
Thank you!
Purvi says
Hi! My cheesecake was very very jiggly through when done in the instapot. Do you have an idea as to what may have gone wrong?
Archana says
I am not sure if any changes were done to the original recipe. You can always pressure cook for additional 5 mins. It will also continue to cook and set as it cools down.
Sneha says
I’d like to make this using gluten free graham crackers. About how much do all the crumbs weigh in your recipe (or a conversion to cups would work, too, e.g., 1.5 cups of crumbs)? Thanks!
Archana says
You need 1 cup of crumbs.